Build powerful and customizable skill trees in your project for Gamemaker.
Features
Skill Tree Engine is a library that can be imported into a GameMaker project to design and implement functional skill trees that apply effects to in-game actions and trigger immediate effects on unlock.
Includes:
Plot skill node coordinates by Rank and Position
Assign max levels, sprite images, and costs to a node
Set prerequisite conditions before a node can be levelled
Apply permanent or instant effects on level-up
Lock specific nodes based on set requirements
Choose level-up styles: instant, hold, or deferred
Allow items to boost skill levels
Appearance options for tree layout, skill nodes and lines
Support multiple trees that can be switched and interacted with
Navigate quickly across large trees with zooming and panning functionality
About
Developed by BrentBruthaa (Fat Pint Games) and is compatible with GameMaker 2024.11.x+ or newer.
The Easy Skill Tree Engine is developed and owned by Fat Pint Games.
Use of the Skill Tree Engine is subject to the End User License Agreement (EULA) provided with the product at the time of purchase via itch.io.
The license grants permission to use the source code in personal and commercial projects, but does not permit redistribution or resale of the source code, whether modified or unmodified.
Setup
Import the library, add the manager object, configure macros, and start defining trees.
Getting Started
Create a Tree Builder project
Import the Easy Skill Tree Engine Builder .yymps package into a new empty project. (Setting Room_Tree_Builder as the default room)
Add the Engine Source Files into your project
Import the Easy Skill Tree Engine Base Package .yymps package into your project.
Create the skill tree manager object in your project
Place the persistent object obj_skill_tree in an initial room, or create it during game setup.
Update the skill_tree_is_active() function
This function should return true when you're ready to interact with the skill tree.
Eg: When your menu is opened and the menu page is set to view the skill tree.
Edit macros
Open the ESTE_MACROS script file.
Read each macro comment, and set the parameters you want for your game.
Create skill trees to use in your game
Use the visual editor to craft your skill tree and export/import the GML to build your tree to your project.
Or create your own skill tree/nodes using the constructors and available methods.
See Creating a Skill Tree and SkillNode sections to build your own skill trees.
Macro Configuration
The below macros allow for a range of customization for the behaviour of your skill trees. Read through them and adjust as necessary to produce the kind of skill tree you're trying to make.
Macro
Default Value
Purpose
SKILLTREE_OBJECT
obj_skill_tree
The skill tree manager object name
SKILLTREE_ARRAY
SKILLTREE_OBJECT.skill_tree_array_
Points to the array containing all the skill trees for the purpose of getting all skill and stat values
SKILLNODE_DEFAULT_COST
[["global","skill_points",1,"SP"]]
The default cost to perform a level up action if no other cost is specified
PLAYERLEVEL_VARIABLE
global.player_level
The variable holding the player's level which is referenced in player level prerequisites and updating locks
ITEM_ARRAY
global.item_list
The array holding the catalogue of available items
LEVEL_UP_ACTION_SOUND
snd_node_level_up
Sound when levelling a node
SKILLTREE_DEBUG_MODE
true
Enable debug keystrokes during testing
INPUT_CONTROL_TYPE
controller_type.keyboard
Starting controller type used to navigate tree. Keyboard type also includes gamepad input.
INPUT_CONTROL_LOCK_TYPE
false
set to true to prevent switching of input types when mouse is clicked/moved or controller button is pressed
SKILLNODE_FRAME_SPRITE
spr_node_frame
The background sprite used for skill nodes
SKILLNODE_FOCUS_SPRITE
spr_node_frame_focus
The sprite that draws over a node to show it’s being focused
SKILLNODE_LOCK_SPRITE
spr_node_locked
The sprite to indicate that a skill node is locked
SKILLNODE_FRAME_SIZE
64
Set this macro to the draw size of your nodes
SKILLNODE_DRAWX_OFFSET
0
Global X offset for nodes
SKILLNODE_DRAWY_OFFSET
0
Global Y offset for nodes
SKILLNODE_USE_FOCUS_SPRITE
true
Use sprite (vs shape) to show focus
SKILLNODE_FOCUS_STANDARD_COLOUR
c_white
Blend colour of focus sprite
SKILLNODE_FOCUS_OSCILATION_TIME
1.2
Amount of seconds it takes for the focus frame to grow and shrink
SKILL_PANEL_ENABLE
true
Allows for a description panel to be activated when a node is selected and included in boundary calculations
SKILL_PANEL_WIDTH_RATIO
0.225
Percentage of screen width that makes the description panel (left and right side)
SKILL_PANEL_HEIGHT_RATIO
0.225
Percentage of screen width that makes the description panel (top and bottom side)
SKILL_PANEL_ALWAYS_OPEN
true
Sets whether the description panel is always visible or slides out when not focused on a node in mouse controller mode
SKILL_PANEL_UNLOCKREQ_ONLYMISSING
true
The description panel will show only what is still required to unlock a skill. Set to false to show everything that is required whether it's already achieved or not
SKILL_PANEL_LOCKED_SHOW_NAME
false
Show the skill name for locked nodes in the description panel
SKILL_PANEL_LOCKED_SHOW_DESC
false
Show the description for locked nodes in the description panel
SKILL_PANEL_SHOW_COST
true
Show level-up cost in the description panel
SKILL_PANEL_DRAW_NEXTLEVEL_DESC_ON_MAX
false
show the skill description for the next level when the skill's current level >= it's maximum level
LERP_TO_SCROLL
true
Scroll smoothly when scrolling through tree. Disable to snap to position
SKILLNODE_ORDER_SPACING
1.8
Spacing ratio of nodes within a rank
SKILLNODE_RANK_BUFFER_RATIO
2.5
Spacing ratio of nodes between ranks
NODE_DRAW_ITEM_LEVELS
true
When drawing skill levels on a node, this macro will separate level values earned from items and level up actions
NODE_DRAW_COST
false
Draws the cost of performing a level up action on the nodes themselves
NODE_DRAW_LINES
true
Draw lines between nodes
NODE_TRIM_LINES
false
If NODE_DRAW_LINES is set to true, this will trim lines drawn so they're not drawn under the node's frame
NODE_DRAW_LINE_TRIANGLES
true
Draw triangles on lines
NODE_LINE_WIDTH
SKILLNODE_ICON_SIZE / 6
Thickness of lines drawn between nodes
GUI_DRAW_TREE_ARROWS
false
If more than one skill tree exists, draw animating arrows at edges of screen
SKILL_DRAW_COST_ONLY_IF_NOT_DEFAULT
true
OIf NODE_DRAW_COST or SKILL_PANEL_SHOW_COST is true, only draw the cost if it is not the same as the default cost specified in SKILLNODE_DEFAULT_COST
SKILL_ALLOC_HOLD_TIMER
1.0
Time in seconds to level up a skill in HOLD allocation mode
ZOOM_OUT_LIMIT
2.5
The maximum amount you can zoom out. The greater the value, the more you can zoom out.
ZOOM_IN_LIMIT
1
The maximum amount you can zoom in. A value of 1 is the true size of the tree and nodes, a value smaller than 1 zooms even closer to your tree
GAMEPAD_STICK_TO_ZOOM
true
When using gamepad, use the thumbstick to zoom in and out. (Select which stick in skill tree object create event)
GAMEPAD_ZOOM_FOCUS_POINT
zoom_focal_point.center
When switching to gamepad, focus point for zooming will switch to this value
MOUSE_ZOOM_FOCUS_POINT
zoom_focal_point.mouse
When switching to mouse, focus point for zooming will switch to this value
CLOSE_GAP_ON_ZOOM_OUT
false
When zooming out, keep tree close to the nearest edge when node positions exceed past the opposite edge
ZOOM_SHOW_SLIDER_DIR
dir.left
Display a slider bar on a side of the screen that can be dragged and adjusted by the mouse. (Set as -1 or undefined to hide)
MOUSE_WHEEL_TO_ZOOM
true
When scrolling up or down on the mouse wheel, zoom in and out of the skill tree (if nodes are placed outside node scroll bounds)
MOUSE_WHEEL_TO_SCROLL
false
When scrolling up or down on the mouse wheel, scroll vertically up or down on the skill tree (if nodes are placed outside node scroll bounds)
MOUSE_AT_EDGE_TO_PAN
true
When positioning the mouse cursor at an edge of the screen, the tree will pan in that direction
MOUSE_BUTTON_TO_PAN
true
When holding the mouse button down and moving the mouse, the tree will pan around as the mouse is moved
MOUSE_PAN_INVERSE_DIRECTION
false
Reverse the direction the tree pans when using the mouse button to pan
GAMEPAD_PAN_ALWAYS_SELECT_CENTER
true
If true, whenever panning with a gamepad, the node closest to screen center will be focused, otherwise it will only focus centre if the previous node is out of node scroll thresholds
EDGE_SCROLL_X_RATIO
0.02
Spacing ratio of screen at edges that scrolls the nodes horizontally
EDGE_SCROLL_Y_RATIO
0.04
Spacing ratio of screen at edges that scrolls the nodes vertically
EDGE_SCROLL_SPEED
10
Speed that nodes scroll when mouse is at screen edges
NODE_SCROLL_LOCK_TIME
0.4
Time in seconds before another node outside of boundary thresholds can be scrolled to following a previous scroll
Allow scroll if nodes fall outside the screen edge minus this buffer
ENCRYPTION_KEY_XOR
"FatPintGames_EasySkillTreeEngine"
Export encryption key (change this)
Understanding Skill Trees and Skill Nodes
A Skill Tree is the canvas; Skill Nodes are the abilities placed on it.
Basics
A Skill Tree contains all the rules that will apply to all nodes in that tree such as its orientation, layout, etc.
A Skill Node represents a single ability that can be learned and levelled when requirements are met.
The creation of a skill tree consists of 4 primary steps
Create the tree using the constructor new SkillTree(...)
Create nodes using the constructor new SkillNode(...)
Add Skill Nodes to the Skill Tree
Push the Skill Tree to the tree array (default: obj_skill_tree.skill_tree_array_)
Orientation
SkillTree variable: orientation_
Variable Type: Numeric/Enum
Enum Options:
orientation.vertical_bottom_up
orientation.vertical_top_down
orientation.horizontal
Each Skill Tree has an orientation, either Horizontal or Vertical. If a Skill Tree’s orientation is set to orientation.vertical_bottom_up, skill ranks will be drawn to the screen from bottom to top.
If the Tree’s orientation is set to orientation.vertical_top_down, the ranks will be drawn to the screen from top to bottom.
If the Tree’s orientation is set to orientation.horizontal, the ranks will be drawn to the screen from left to right.
Typically, consistency with orientation across all skill tree orientations is more common in commercial games, however you can set each Skill Tree’s orientation separately.
Ranks & Order
SkillNode variables: rank_, order_
Variable Type: Real
A Skill Tree displays Skill Nodes in “Ranks”. Typically, skills that are created in rank 0 are available from the beginning or in the earliest stages of the game. As skills are levelled up and specific criteria are met, skills on higher ranks can be accessed.
In a vertical bottom up skill tree, rank 0, order 0 is drawn at the bottom center of the screen and higher ranks are drawn above.
In a vertical top down skill tree, rank 0, order 0 is drawn at the bottom center of the screen and higher ranks are drawn below.
In a horizontal skill tree, rank 0 is drawn at the left of the screen and higher ranks are drawn to the right.
Although the first rank is identified by rank “0” in code, in game the smallest rank is referred to as rank “1” (for readability of the player)
Each skill in a rank is drawn in its “Order” Value.
The Order value of 0 represents the position in the very centre of the rank. In a vertical orientation, an Order value of -1 represents the Skill Node position to the left of the centre and an Order value of 1 represents the Skill Node position to the right of the centre position.
In a horizontal orientation, an Order value of -1 represents the Skill Node position just above the center position and an Order value of 1 represents the Skill Node position just below the centre position.
You can assign an order that is not a whole number to have it drawn at an offset
You can also assign an rank that is not a whole number to have it drawn at an offset however this is not recommended as different functions check ranks and the correct rank data needs to be supplied
A node's rank should not be below 0, this will cause it to not be in focus when drawn on screen
Layout
SkillTree variable: layout_
Variable Type: Numeric/Enum
Enum Options:
layout.standard
layout.symmetrical
Each skill tree also has two layout options. A layout can be set to either layout.standard or layout.symmetrical. If a Tree’s layout is set to layout.symmetrical, it will draw skills on a rank in a symmetrical fashion where it is able to.
So for example if a rank contains two skills at order positions 0 and 1, the symmetrical layout will adjust those nodes to be drawn at order -0.5 and 0.5.
Otherwise, in a standard layout, nodes will be drawn with respect to it’s exact Rank and Order values.
Skill Levels
SkillNode variable: current_level_
Variable Type: Numeric
A skill node is assigned a Current Level which by default is set to 0. When a skill is levelled up for the first time by paying its cost, its current level is set to 1. Skill Nodes provide the capability to improve player functions like player stats or skill stats with each level.
For example: Imagine a skill node that grants the ability “Fireball” that inflicts 5 damage and applies the status effect “Burn” for 5 seconds. Levelling up this Skill Node again to level 2 can improve the performance of the Fireball skill to now inflict 8 damage and apply Burn for 7 seconds.
Each skill node has a cost requirement in order to level up. By default the cost of a Skill Node is set to ‘1 Skill Point’. This is indicated by the cost array that uses global.skill_points as the currency pool for levelling up skill nodes. The term “SP” is used to abbreviate the currency name and is displayed in game.
As a developer, you might decide that skill costs may vary such that a skill can become more expensive per level. The cost array can be updated as an instant effect to levelling a node.
You might also decide that a skill should cost 30 gold from a global.gold variable instead of a skill point. That is also achievable by setting the cost_ variable as: [["global","gold",30,"GP"]]
You might want to apply multiple costs to level up a skill such that a skill should cost 1 skill point, 30 gold and 3 royal tokens (from a separate global.royal_tokens variable). That is also achievable by setting the cost_ variable as:
Ensure that all variables used as costs are accessible when attempting to level up a node to prevent crashes
So for example if your cost is set to [[obj_player, "gold", 30, "GP]]
but your player object is deactivated during a pause, then trying to access this variable will cause a crash
Finally, you can specify that there is ‘no cost’ to level up a skill node by just setting the cost_ value to 0 instead of an array. A skill node that has ‘no cost’ is still subject to other level, rank, tree requirements.
A Skill Node can only be levelled up if the player has the specified cost available.
Note: If your cost is referencing a global variable, the first argument can be written as global instead of "global". Writing it as a string is only an option to ensure the cost can be serialized when choosing to export your tree to a file.
Max Level
SkillNode variable: max_level_
Variable Type: Numeric
Each skill has a Maximum Level. If the current_level_ of a Skill Node is equal to the max_level_, then the player cannot perform any more level up actions on that skill.
The current_level_ of a Skill Node cannot exceed the max_level_, however it is possible for a node’s effective level to exceed it’s Max Level using items.
Item Level
SkillNode variable: item_level_
Variable Type: Numeric
Items have the ability to add additional item levels to Skill Nodes to increase its overall effective level to its current_level_ + item_level_. By equipping items, a Skill Node’s effective level can exceed its Max Level.
Advanced Skill Node Concepts
Prerequisite Nodes
SkillNode variable: prerequisites_
Variable Type: Array
Prerequisite conditions can be applied to a node to prevent it from being levelled up until all requirements are met. One of these requirements is to assign “Prerequisite nodes” or “Parent Nodes” that must first reach a minimum level (current_level_).
Rank Requirement
SkillNode variable: rank_requirements_
Variable Type: Array
Another condition that can be applied to a Skill Node is a rank requirement. A node with a rank requirement cannot be levelled up until nodes on the required rank has collectively been levelled up the amount of times specified in the requirement.
So for example, you can have a skill on rank 1 having the requirement that a level up action was completed successfully 3 times amongst the skills on rank 0 before it can be levelled up itself.
Player Level Requirement
SkillNode variable: player_level_required_
Variable Type: Numeric
Another condition that can be applied to a Skill Node is a player level requirement. A node with this type of requirement cannot be levelled up until the player’s level has reached a minimum value specified by the requirement.
Tree Point Requirement
SkillNode variable: tree_points_required_
Variable Type: Numeric
Another type of condition that can be applied to a Skill Node is a Skill Tree Point Requirement. This requirement specifies that this Skill Node cannot be levelled up until the minimum amount of level up actions have been performed collectively across all nodes on the focused skill tree.
Node Group Requirement
SkillNode variable: node_groups_
Variable Type: Array
The final type of condition that can be applied to a Skill Node is a Node Group Requirement. This requirement specifies that this Skill Node cannot be levelled up until the minimum amount of level up actions have been performed collectively across nodes that have beed added within a specified group.
Requirement Combinations
It’s possible to combine multiple requirement types on a single Skill Node. So for example, you can specify that the “Fireball” skill cannot be levelled until:
Prerequisite node 'Fire Bolt' has reached level 2
At least 4 level up actions have been completed on rank 0
The player is at least level 5
Level up actions cannot be peformed on a node until all the level up requirements have been met
Immediate Effects
SkillNode variable: immediate_effects_
Variable Type: Array (containing structs)
A skill node can trigger an immediate effect the moment a node is levelled up. This involves modifying a single or multiple variables to communicate to your game that your player now has a specific ability. This can also directly modify a player stat or any currently existing variable.
A function can be executed upon a skill level up to make the ability more tailored to the developers vision.
Stat Formulas
SkillNode variable: stat_formulas_
Variable Type: Struct
Stat formulas hold specific values and necessary calculations relevant to the skill tree. For example, your “Fireball” skill has the following description:
“Inflicts 5 fire damage and applies the status effect “Burn” for 5 seconds.”
The stat formula struct would hold the calculations to determine how much fire damage is inflicted by the fireball and how long the burn status is applied for in seconds.
A linear stat formula could simply state that for every level, the fire damage is increased by 5 and the burn duration is increased by 1 second.
So when this fireball skill is levelled up to level 3, it will then show the description:
“Inflicts 15 fire damage and applies the status effect “Burn” for 7 seconds.”
And will behave as such.
Level Overrides
SkillNode variable: level_overrides_
Variable Type: Struct
Level overrides can be applied to a skill node to completely override a value that will be returned from a stat formula for a specific level. For example:
Your “Fireball” skill as above should increase its fire damage by 5 every level. By level 3, the skill would normally inflict 15 fire damage. By applying a level override, you can specify that when this skill reaches level 3, it will ignore the stat formula’s 15 damage and instead will inflict a different value that you specify in the override (Perhaps 11 damage).
A single override is applied to a single stat for a single level. So if you want to override the damage and duration on multiple levels, the level and value at each override level will need to be specified.
Active Trees
SkillNode variable: active_
Variable Type: Boolean
A skill tree has an active status which determines whether stat values can be derived from nodes in the tree.
Say for instance you have two skill trees that contain levelled up nodes affecting the player’s strength stat. Whenever you swing your sword, your game will check your total strength bonus from all active trees. If one of those two skill trees is set to active_ = false then when you perform the stat bonus check, it will only return bonuses from the active skill tree.
A Skill Node that is inactive is also automatically set to invisible.
Tree Visibility
SkillNode variable: visible_
Variable Type: Boolean
If a skill tree is set to invisible, it cannot show when switching between skill tree pages in the menu. Being invisible doesn’t prevent bonuses being derived from a skill tree. For example:
Say you’re making a roguelike game where you earn gold each run. In your main menu you have a “bonus” skill tree where you can spend your currency to level up nodes and unlock bonuses.
When your main game starts, this main menu skill tree will be set to invisible, but is still active. You won’t be able to change it during your run, but you’ll still have bonuses from the skill tree applied.
Locks
SkillNode variable: locks_
Variable Type: Array
The locks_ array in a skill node contains a list of node IDs that will become locked once the current skill node has a level up action performed on it.
This can be use to create ‘Either-Or’ options where the player will have to choose a path to take, but choosing one path can lock another one.
Important Note!
The function player_level_up(_amount) should always be used to increase (or decrease) the player's level.
This function increases the player level by the specified amount and then checks for any locked nodes that need to be released after satisfying a player level condition.
Lock Status
SkillNode variable: locked_
Variable Type: Boolean
A Skill Node that has its locked_ status set to ‘true’ cannot have any level up actions applied to it regardless if all other requirements are meant. A node that is locked is different to being unlocked and not having requirements met.
A node, once locked will typically be unavailable to the player (with an exception of a level based lock) and is by default drawn with the lock icon overlaying it.
Important Skill Tree Methods
addNode(_node)
Arguments:
Name
Data Type
Purpose
_node
Struct
Contains all node data made from the SkillNode constructor
Add a SkillNode to the tree.
setVisible(_is_visible)
Arguments:
Name
Data Type
Purpose
_is_visible
Boolean
Sets the tree to either Visible or Invisible
Set tree visibility in UI.
SetActive(_is_active)
Arguments:
Name
Data Type
Purpose
_is_active
Boolean
Sets the tree to either Active or Inactive
After a Skill Tree has been created, it’s active status can be set. Stat bonuses cannot be granted from a skill tree that is inactive. Trees that are set to inactive status are also set to invisible and cannot be viewed by scrolling through skill trees.
setDefaultFocusedNode(_id)
Arguments:
Name
Data Type
Purpose
_id
String
When switching to a skill tree, the default focused node will be the one with the ID supplied
After skill nodes have been created and added to the skill tree and the tree has been added to the skill tree array, one of the nodes added to the tree can be selected as the default as the default node. The default node will be focused on whenever switching to view that skill tree.
So say for instance you have a node in the center of your tree that you want to be in focus as you switch your view to the skill tree, instead of having a node on the edge be focused, you would call this function and pass through the ID of your center node.
If the node ID supplied does not match one of the skill node IDs in the tree or is left as undefined, the default focused tree will be the one with the lowest rank and order.
Important Skill Node Methods
addPrerequisite(_node_id, _required_level)
Arguments:
Name
Data Type
Purpose
_node
Struct
Contains all node data made from the SkillNode constructor
_required_level
Numeric
The minimum level the prerequisite node must be to allow this node to level up
Immediately after creation of the skill node, this method can be called to populate a node’s prerequisites_ array. This will prevent any level up actions on this skill node until all prerequisite nodes have met their minimum required level.
addPlayerLevelRequirement(_level)
Arguments:
Name
Data Type
Purpose
_level
Numeric
The minimum level the player must be before any level up actions can be performed on this node
Immediately after creation of the skill node, this method can be called to set the node’s player_level_required_ variable. This will prevent any level up actions on this skill node until the player’s level has reached the minimum required specified level.
addTreePointRequirement(_points)
Arguments:
Name
Data Type
Purpose
_points
Numeric
The minimum number of level up actions on the focused tree before any level up actions can be performed on this node
Immediately after creation of the skill node, this method can be called to set the node’s tree_points_required_ variable. This will prevent any level up actions on this skill node until the minumum amount of level-up actions has been performed on this skill tree.
The ID of the node group to base this node's restriction on.
_levels_required
Numeric
The minimum number of level up actions on nodes in the specified node group required before any level up actions can be performed on this node.
Immediately after creation of the skill node, this method can be called to push a node group requirement struct into the node’s node_groups_ array. This will prevent any level up actions on this skill node until there's been the specified amount of level-up actions performed on nodes within the specified node group.
addNodeToGroup(_tree, _group_id, [_group_name])
Arguments:
Name
Data Type
Purpose
_tree
Struct
Uses the supplied Skill Tree to create or add node groups to.
_group_id
String
Adds node to the node group with the inputted group ID
_group_name
String
(Only needs to be supplied if the node group has not yet been created) Give the node group a name before adding this node to that node group.
Immediately after creation of the skill node, this method can be called to add this node to a node group in the tree's node_groups_ struct. If the node group has not yet been created, this function will also create the group.
setLevel(_level)
Arguments:
Name
Data Type
Purpose
_level
Numeric
Manually set the current level of a skill node
Any time after a skill node has been created, you can manually set the current_level_ of a node with this function. You may want to create a skill tree where a single point has been pre-assigned to a basic skill at the beginning of the game.
lockNodesUponLevelUp(_node_id_array)
Arguments:
Name
Data Type
Purpose
_node_id_array
Array
Array containing all node ids that will be locked when this node is levelled up
After creation of the skill node, this method can be called to set the node’s locks_ array. When this node is levelled up, all nodes with corresponding IDs in the tree will have their locked_ status set to true. Preventing the player from performing any level up actions on the locked node.
This function can be useful in giving your players a choice between one or many skills.
applyPlayerLevelLock(_player_level)
Arguments:
Name
Data Type
Purpose
_player_level
Numeric
Player level that must be attained before the node’s locked status is set to true
After creation of the skill node, this method can be called to set the node’s locked_ value to true, preventing your player from performing a level up action while they are below the specified level.
When the player level reaches the value supplied in this function, the node’s locked_ value will be set to false, if it is not being locked by any other node.
Creating a Skill Tree using the Visual Editor
Creating a Skill Tree using the Visual Editor
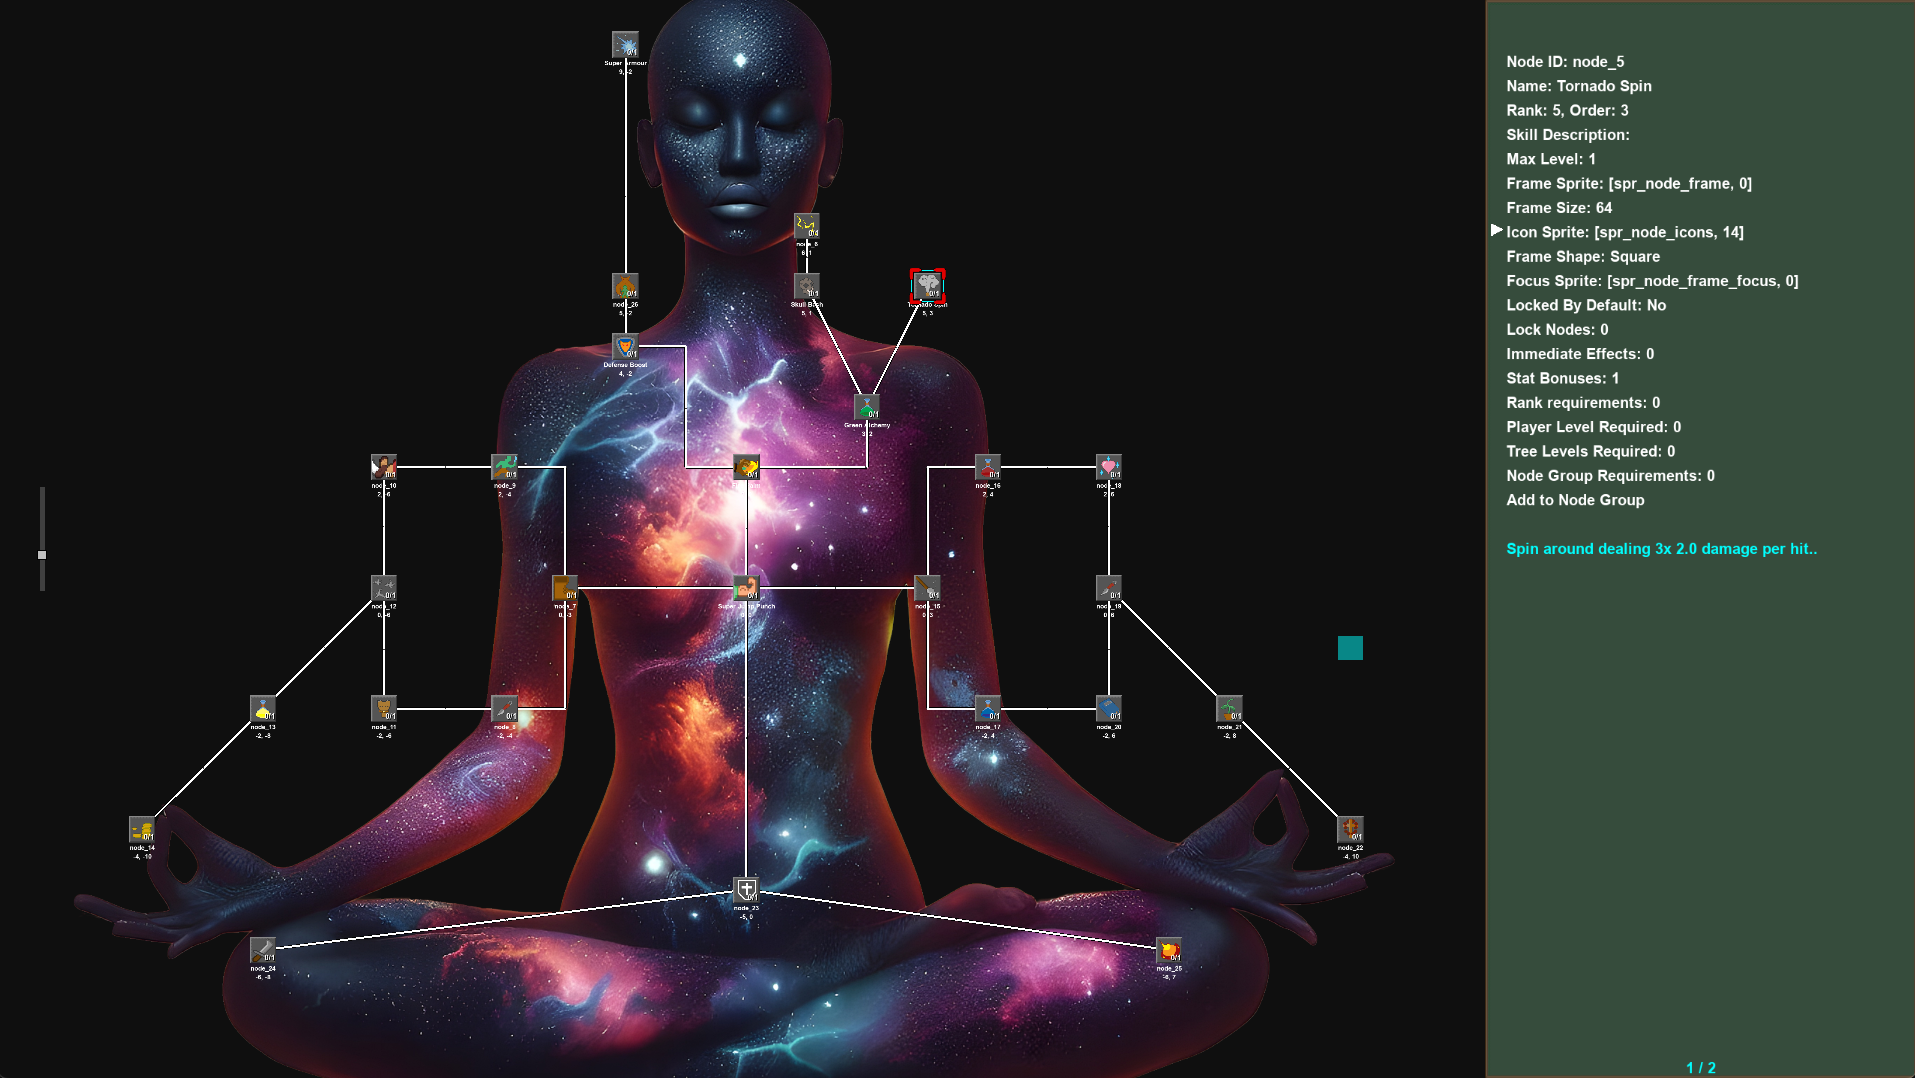
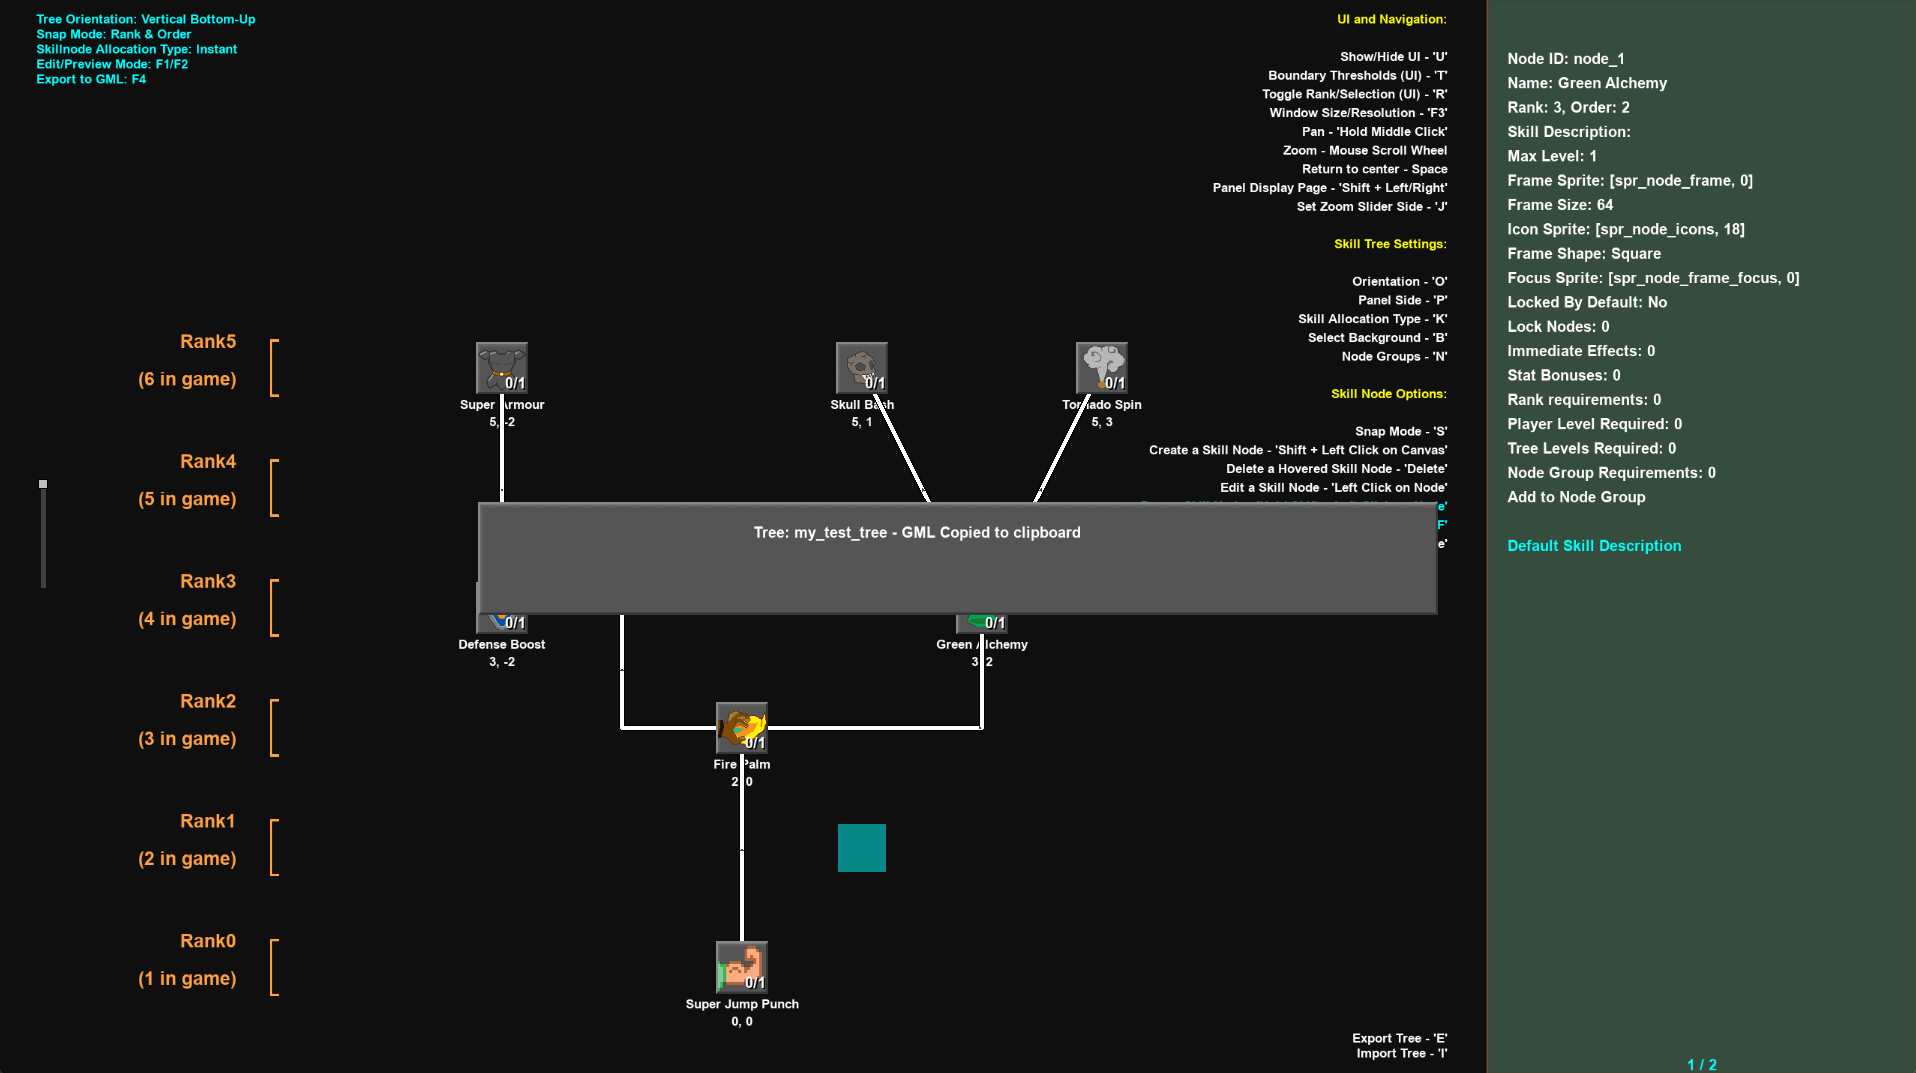
The Easy Skill Tree Engine - Visual Editor makes it incredibly easy to construct large and small trees by simply dropping Skill Nodes onto a canvas with the click of a mouse.
Each node can then be dragged around to be re-positioned and have all their attributes selected and updated so that it functionally and visually represents the Skill Tree you want to use in your project.
Once you’ve built your skill tree, you can easily convert the tree into GML to reconstruct it in your own project.
Initial Setup
If you haven’t already, import the Easy Skill Tree Engine Builder .yymps package into a new empty project. Make sure to set Room_Tree_Builder as the default starting room.
Import any sprite assets that you want to use on your skill tree. This includes sprites for your skill nodes, skill panel and background.
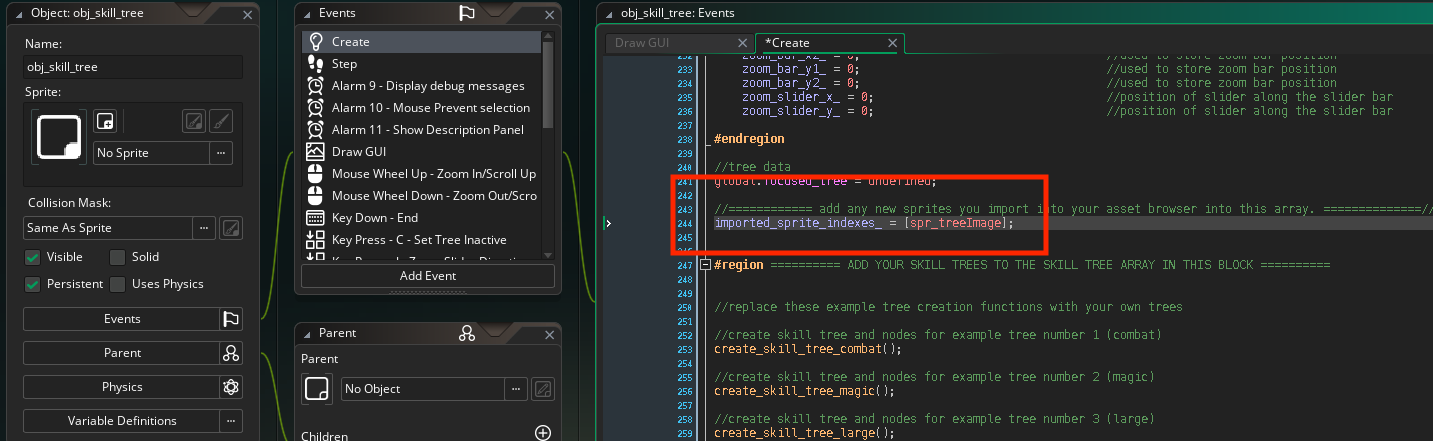
Make sure to reference any sprites you import at least once in code so that it can be found and used by the editor. You can add each sprite index to the imported_sprite_indexes_ array provided to fulfil this purpose.
Visual Editor
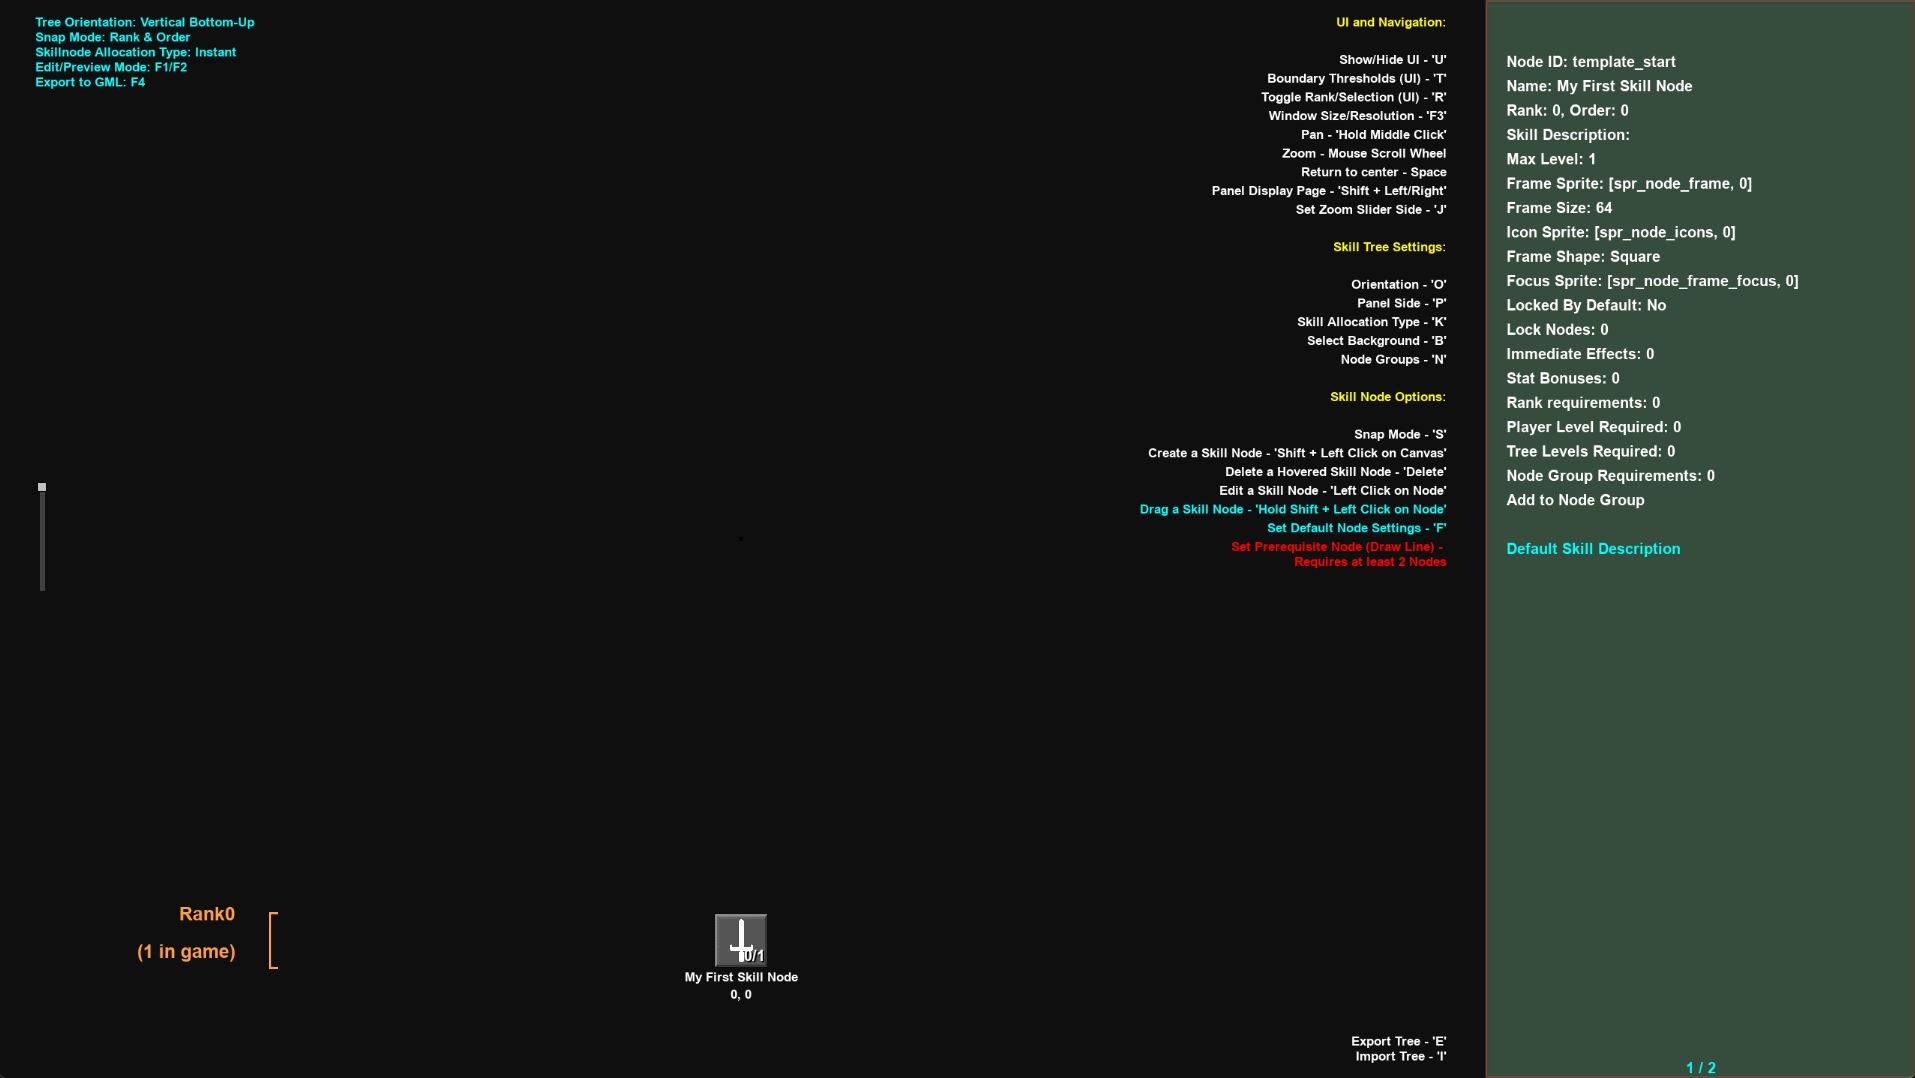
The Visual Editor has a number of options available for you to start setting up your tree. The UI will show you how to navigate the tree as well as how to adjust the tree’s visual aspects such as Orientation and Background.
The builder starts with one node pre-created at Rank 0, Order 0. This node can be changed or moved to get you started with your skill tree.
Set Node Defaults
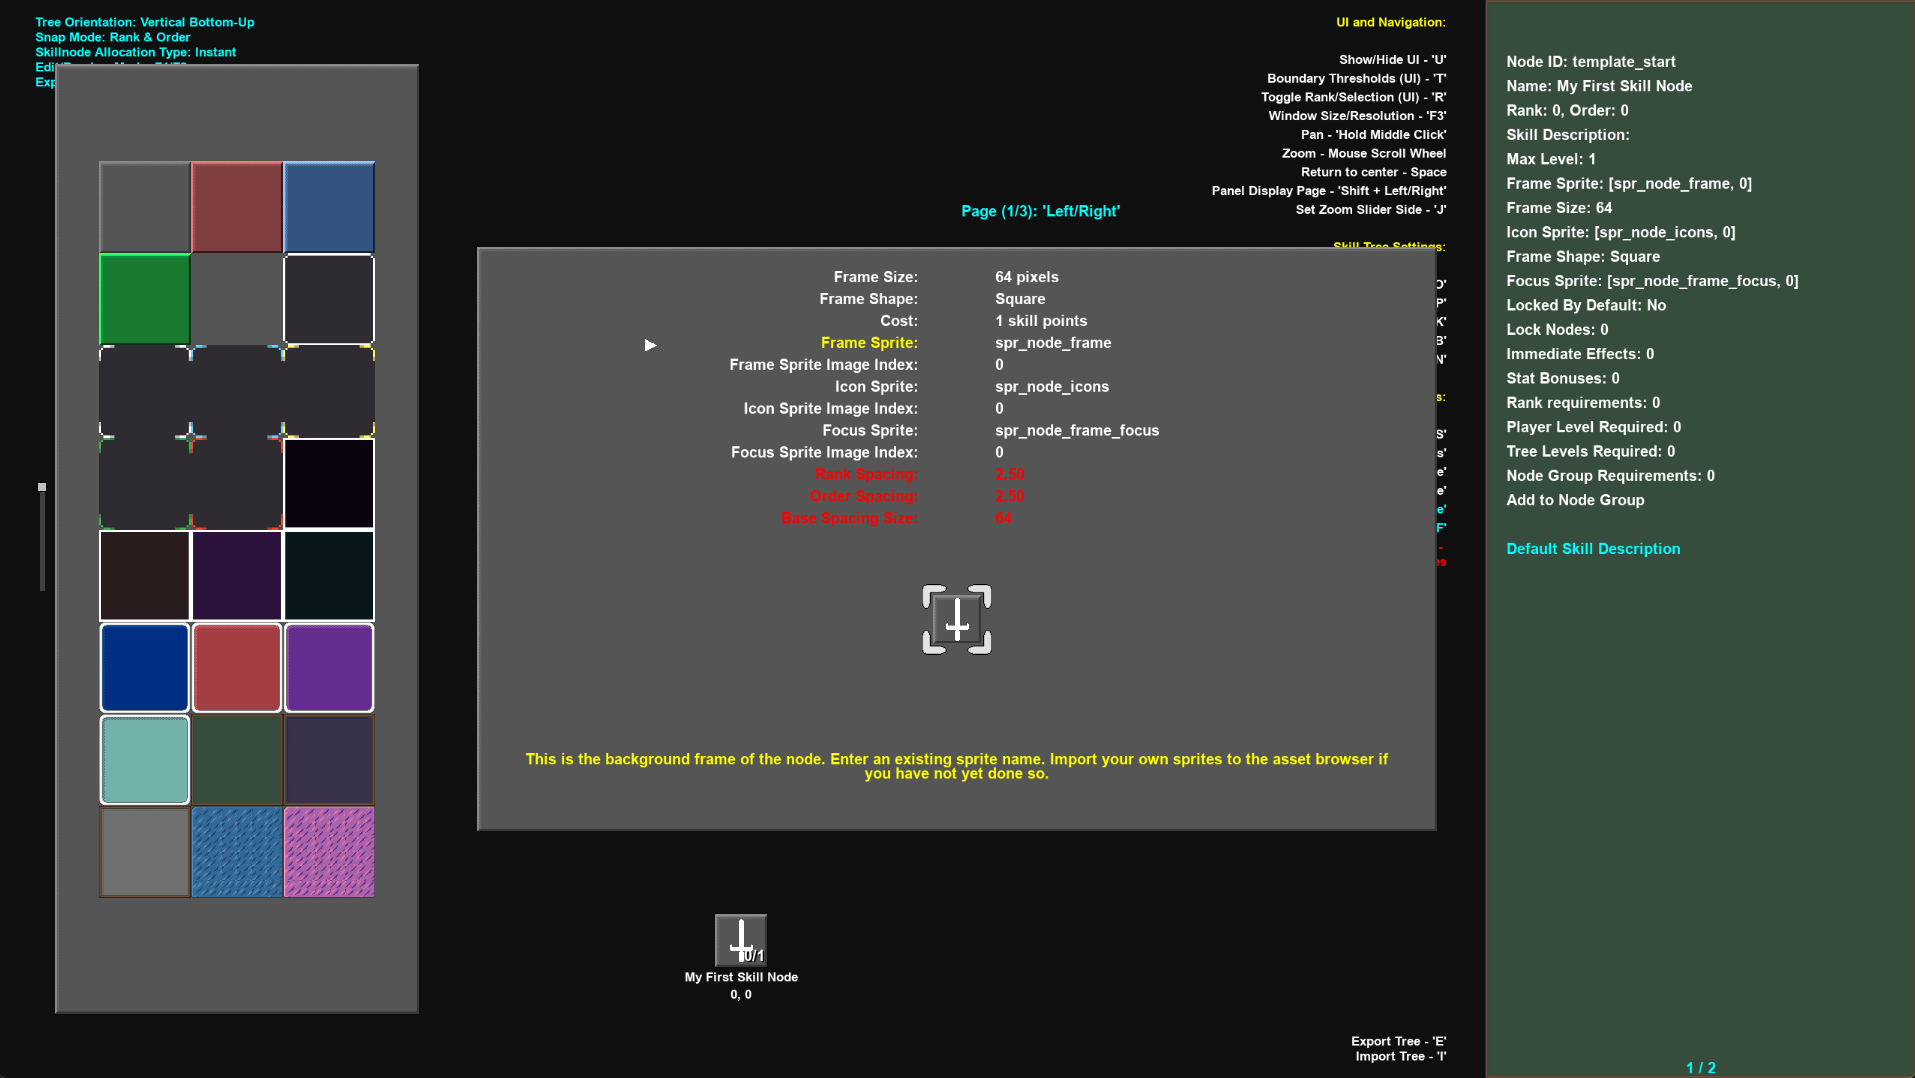
Press the F key to assign the default settings for all nodes created thereafter. You can assign:
Node Frame Size
Shape
Frame Sprite (Background image of each node)
Frame Sprite Image Index
Icon Sprite (Sprite used to pick the icon)
Icon Image Index
Focus Sprite (Sprite used to show the selected node)
Focus Sprite Image Index
Rank Spacing (Distance between ranks)
Order Spacing (Distance between orders)
Base Spacing Size
Any sprites you’ve imported into your asset browser must be referenced in code as noted above, or else you won’t be able to select them from this menu. Once you’ve selected a sprite you can pick the image index from the side picker panel.
Every node that is placed on the canvas will be created with the settings selected in this defaults menu. You want to select defaults that closely represent the majority of your Skill Nodes to ensure as little manual editing on each node as possible.
Note: Currently, Node Cost cannot be changed in the Visual Editor and is set to 1 skill point. This will be updated in a future update.
Place Skill Nodes
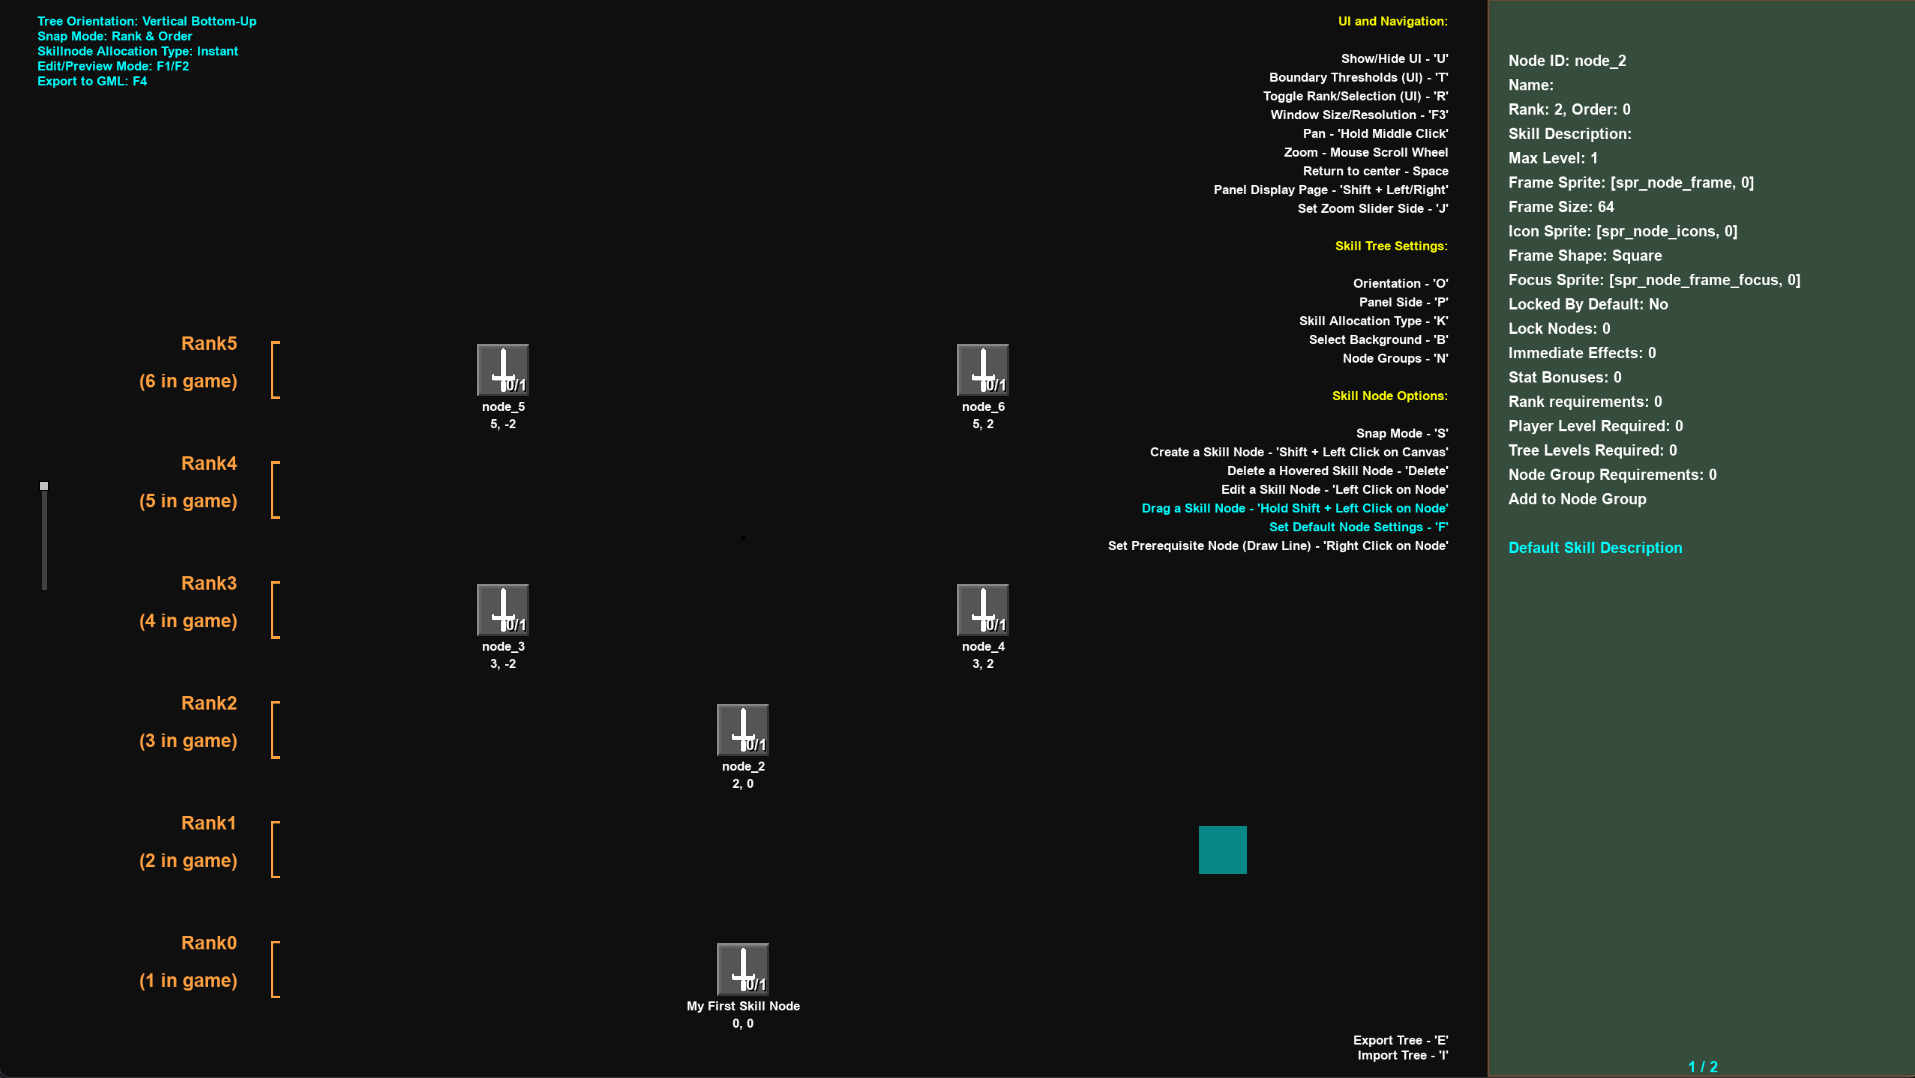
Hold the Shift button and click anywhere on the canvas to place a new Skill Node.
You can also drag a placed node while holding Shift to move it around the canvas.
Nodes can also be deleted by hovering them with the mouse cursor and pressing the Delete button.
When a node is placed, it is dropped on the position indicated by the coloured square. At first, you’ll notice the square is drawn at intervals of each Rank and Order. You can press the S button to update the Snap Mode. There are 3 snap modes.
Rank & Order
Rank & Half Order
Rank Only
Rank & Order
Nodes can be placed at whole number intervals of Order on each Rank.
Rank & Half Order
Nodes can be placed at half intervals of Order on each Rank.
Rank Only
Nodes can be placed freely on any Rank.
Nodes cannot be placed in between ranks. However, if you want to bring nodes closer together you can adjust the rank spacing value in the Node Defaults option above. It is not required that a node is placed on each rank.
Keep in mind that rank and order spacing set in the builder is not carried across in your project and must be set again in the Easy Skill Tree Engine Macros in your project.
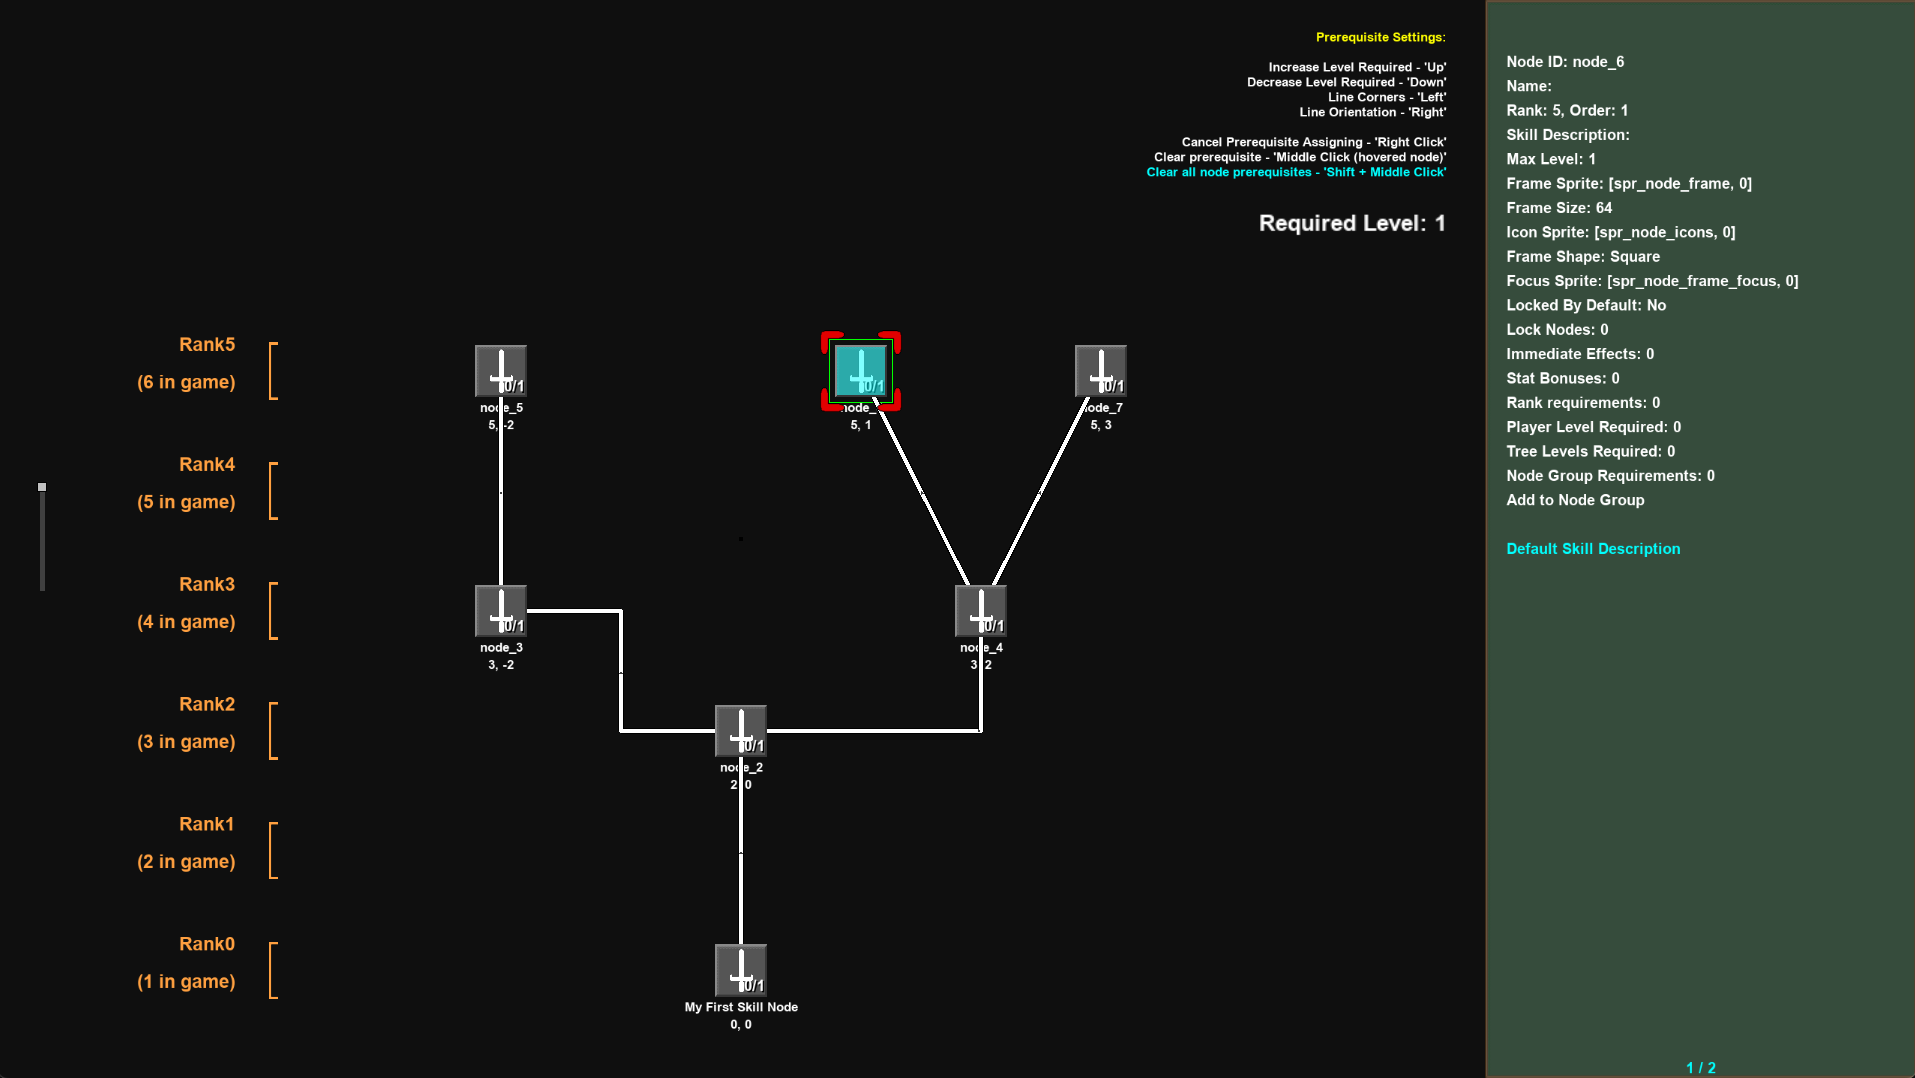
Draw Connections
You can draw pathway connections between nodes to set one to be a prerequisite of another.
Right click a Skill Node to enter the Prerequisite Settings. This allows you to draw a line from one node to another.
The node that was right-clicked becomes a prerequisite that must have a specified number of level-up actions performed on it before the second node can be levelled.
You can press the up and down keys to adjust the required level.
Lines do not have to be a direct straight line from one to another. You can press the left key to add a corner into the line or press it again to have 2 corners in your lines.
You can press the right key to change the starting direction of the line. For example, a line that has 1 corner can be drawn going right and then up first, or it can be toggled to be drawn up first and then right.
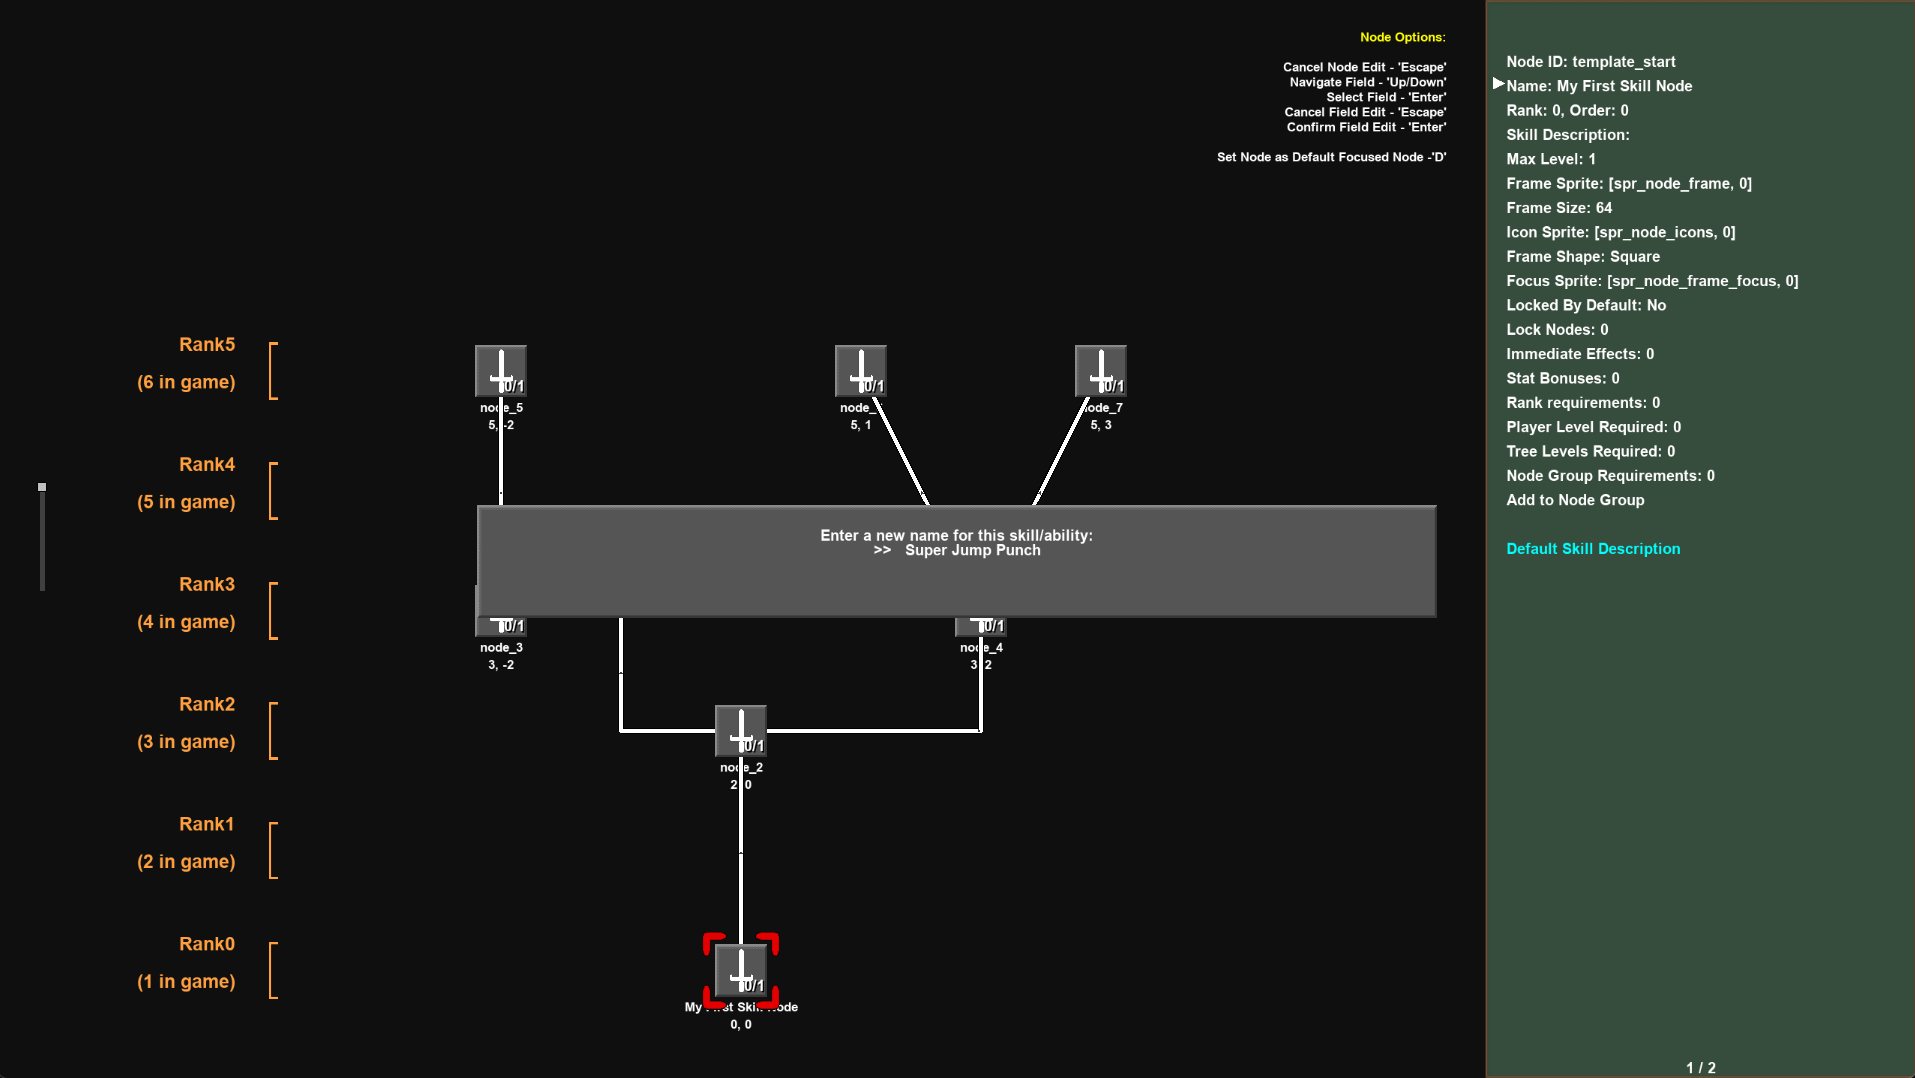
Update Node Values
Nodes can be left clicked to modify their individual attributes. The panel on the right hand side shows a list of attributes that can be selected and updated.
These can be clicked on or selected with the arrow keys and the enter button.
In the below example, the Name attribute of a Skill Node is updated.
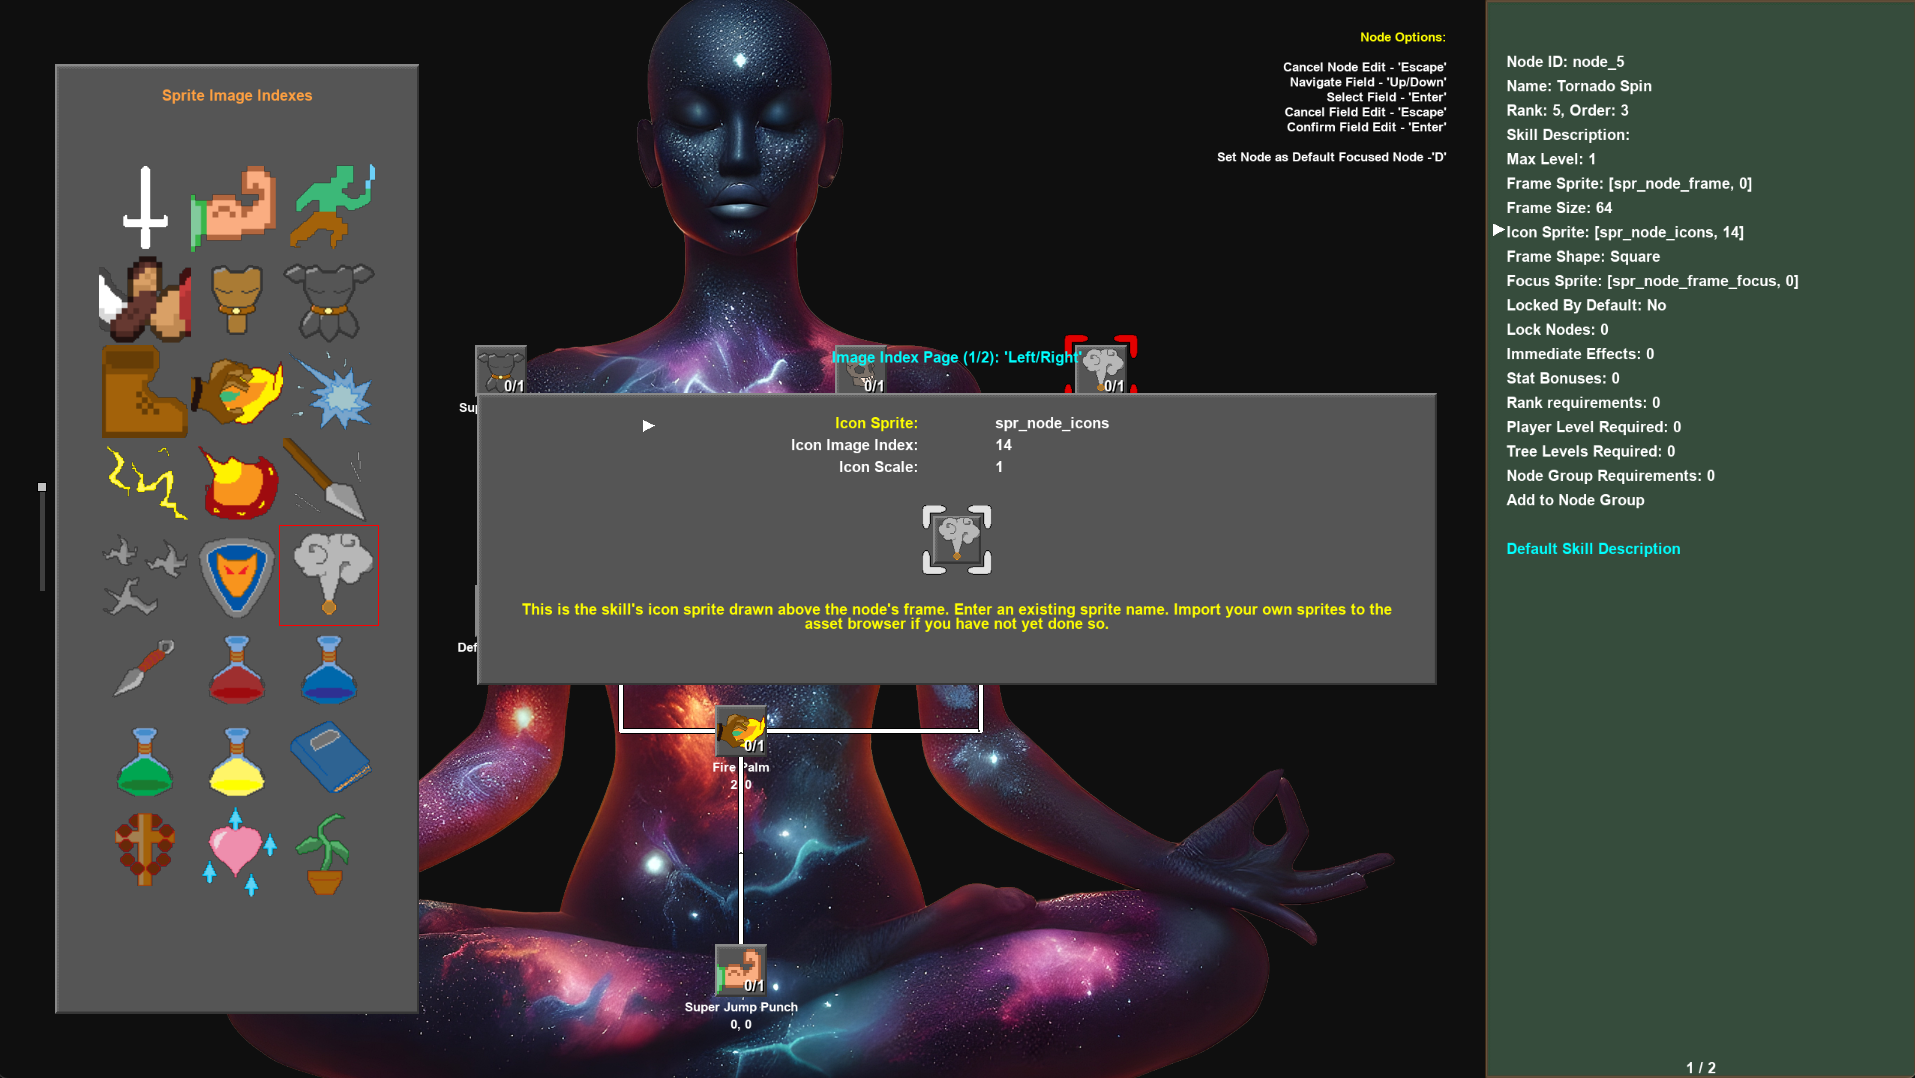
Update Image Icons
Each Skill Node can be given its own individual icon to make it stand out from the others and identify it by its image.
Select the Icon Sprite option on the side panel after clicking on a node. This will open up the sprite selector and image index picker.
You can switch image index page with the left and right keys if there are more image indexes than fit on one page.
The scale of the icon can be updated here as well. A scale of 1 draws the icon at the sprite’s native size. 2 will be double the size. 0.5 will be half.
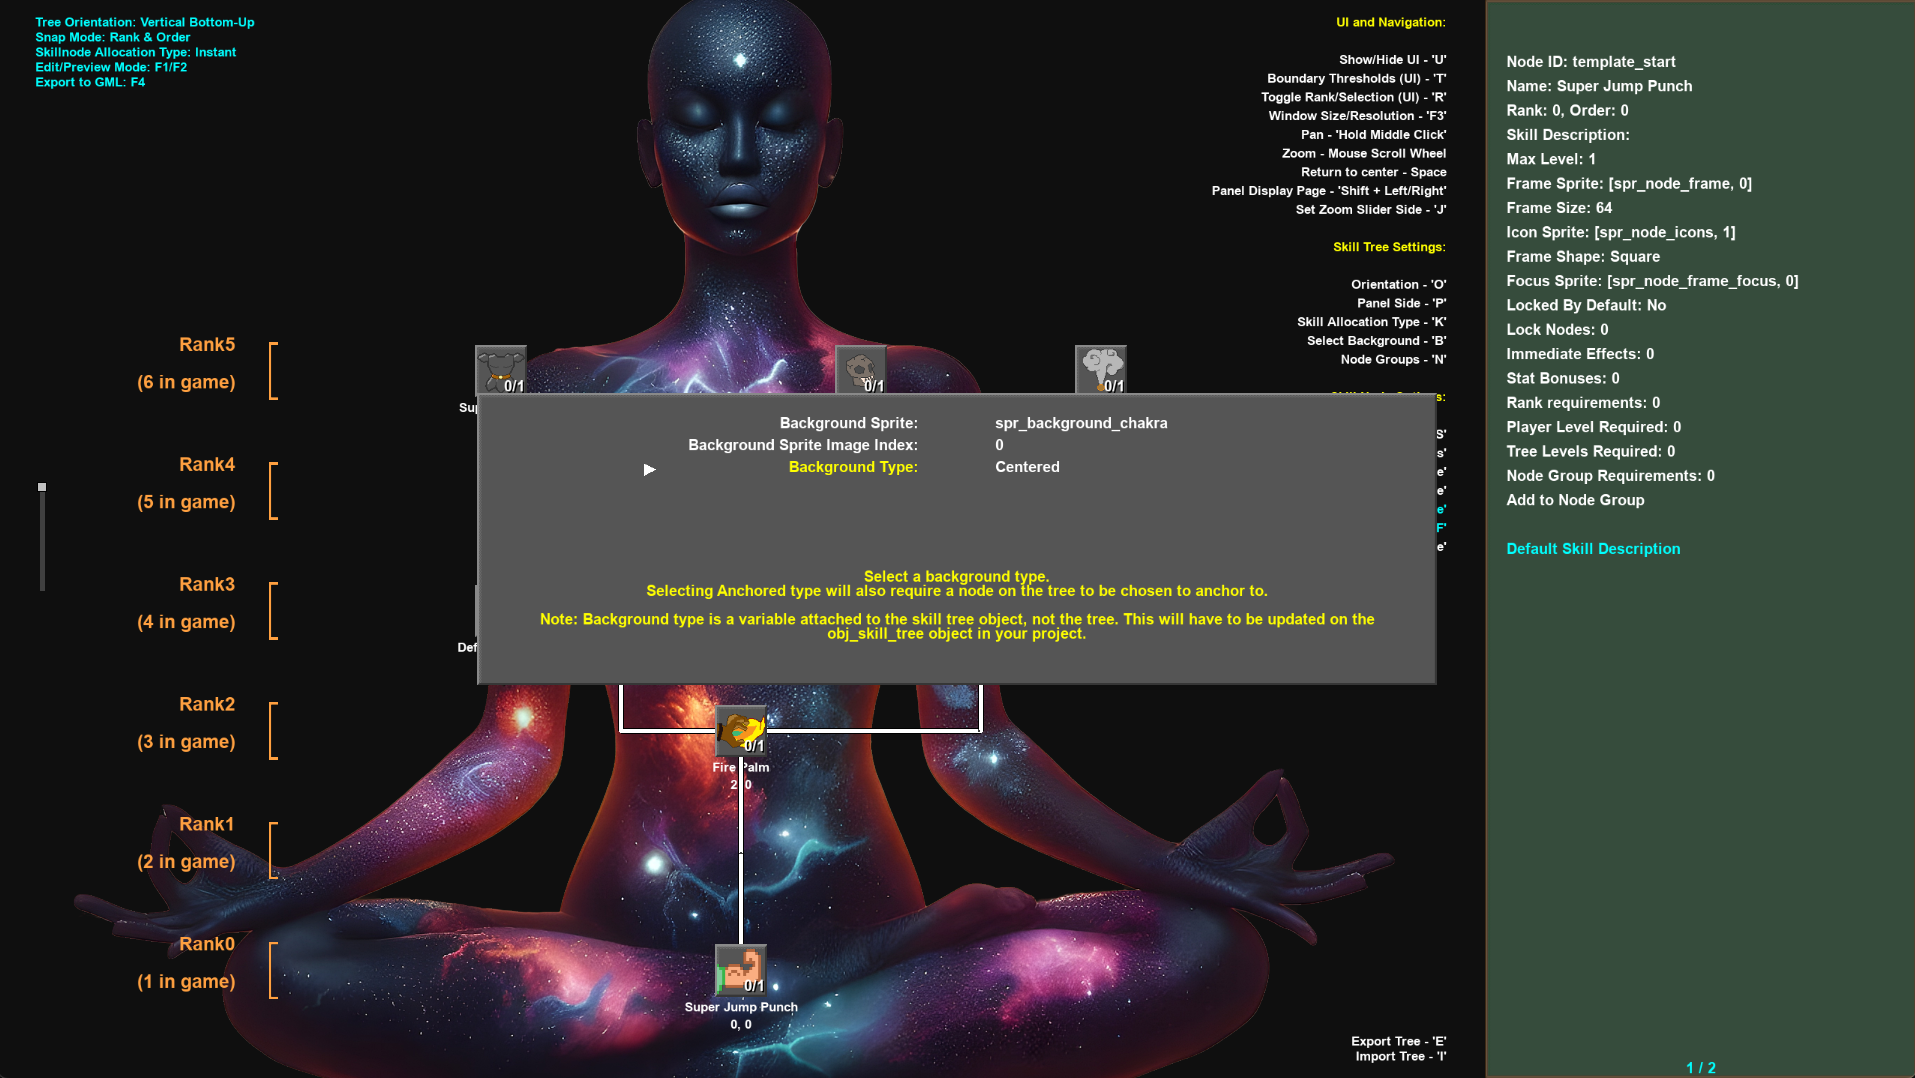
Update Background
The background can be changed with a number of settings.
A background type can be assigned. This value can be either:
Anchored
Centered
Stretched
Scrolling
None
When Anchored type is selected, you have the option to select a node ID. An Anchored background ensures the background image is always positioned behind the selected node.
If the anchor node is moved, the background will continue to move with that node. The selected node will also have a little anchor symbol drawn next to it.
A Centered background is always drawn in the centre of the screen.
A Stretched background is always resized to be drawn across the entire screen.
A Scrolling background will have the background tiled and constantly scrolling across the screen. The horizontal and vertical speeds of this background can be changed by manually updating the bg_scroll_x_ and bg_scroll_y_ values in the skill tree/builder objects directly.
Changing this setting to None removes the current background.
Stat Bonuses
Stat bonuses/Formulas can be assigned to a node by accessing the Stat Bonuses option on the side panel.
This menu has two sub-options.
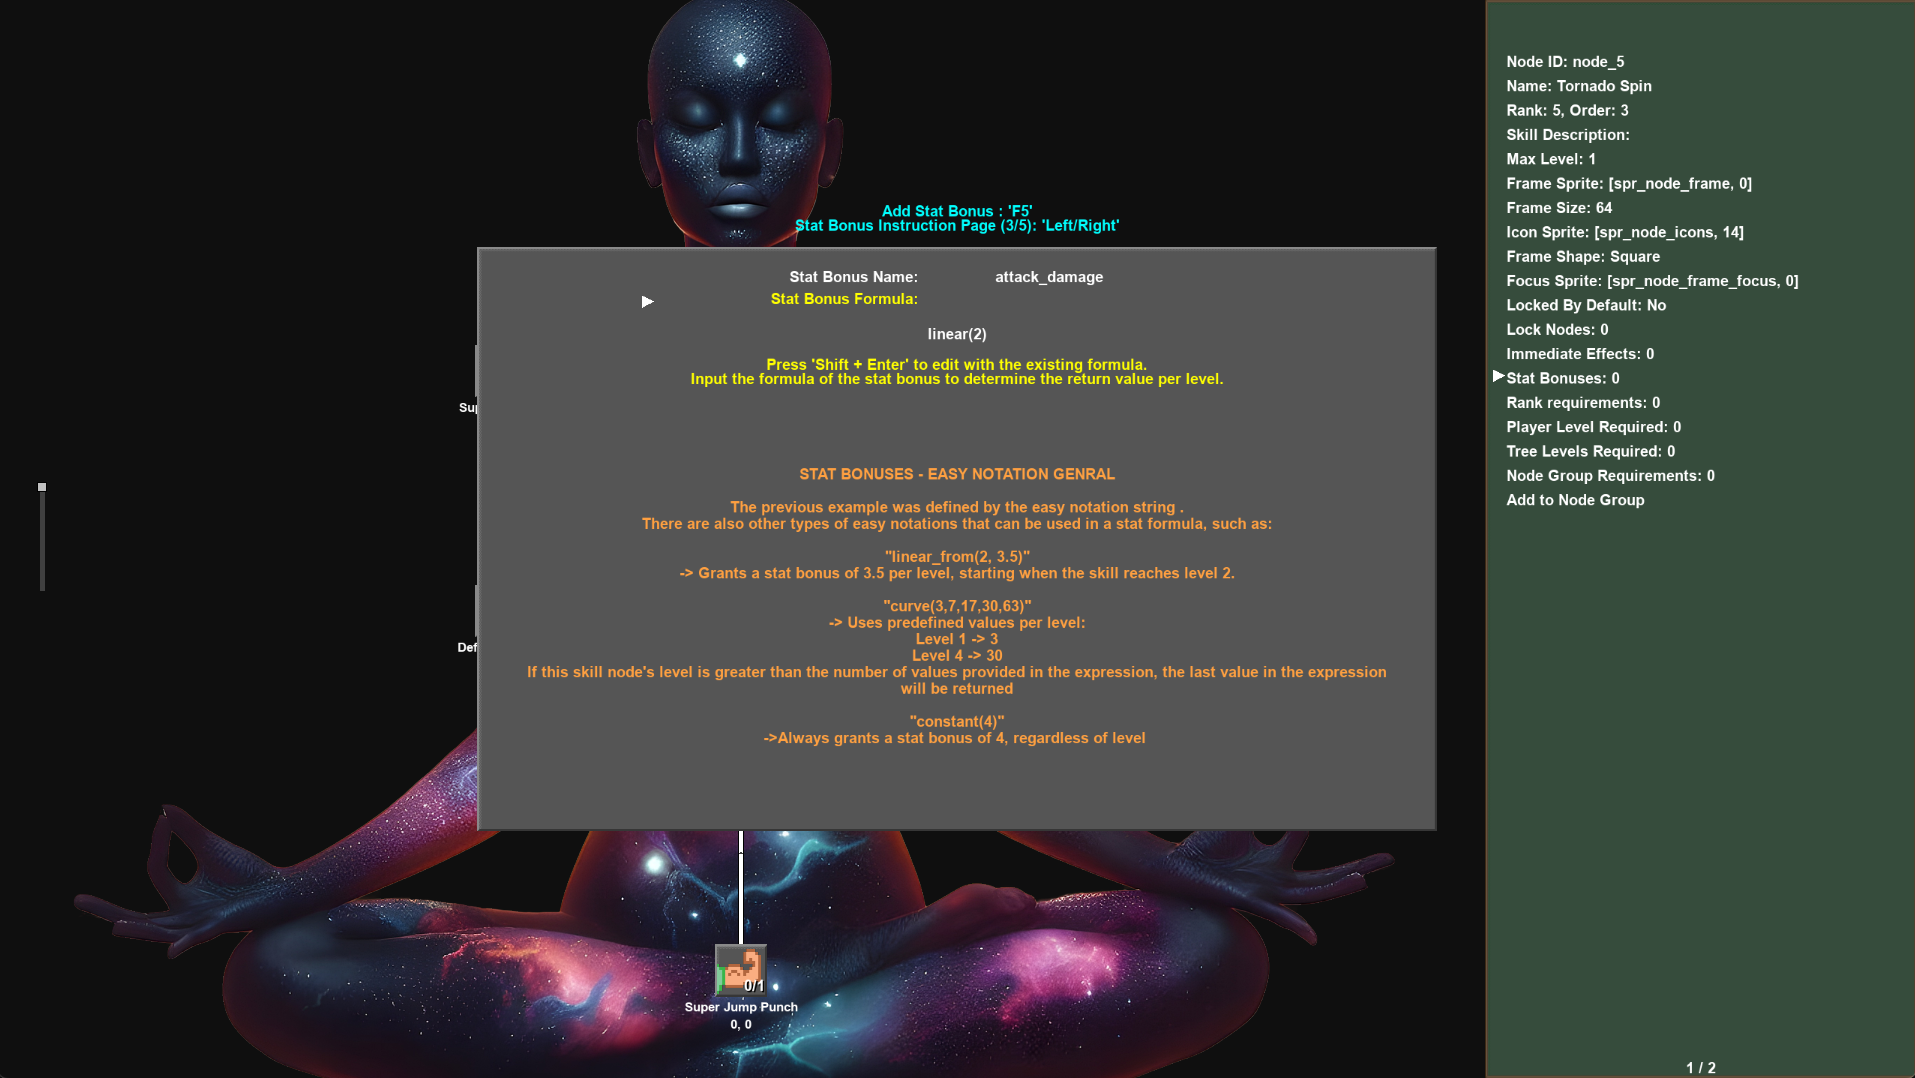
Stat Bonus Name
This is a string to represent the stat bonus that will be granted by this skill node. Multiple skill nodes can also contain the same stat bonus name so that this particular stat can be obtained from multiple sources.
Stat Bonus Formula
This formula determines how the stat bonus is calculated and what amount is granted when the Skill Node is levelled up.
The visual editor only allows for formulas to be inputted using the Easy Notation outlined in the Stat Formulas section.
The default Stat Formula is linear(2). This formula grants 2 of this stat bonus every level. So, for example, if your stat bonus was STR, then at skill level 3 this node will grant you a bonus of 6 STR.
Add Description
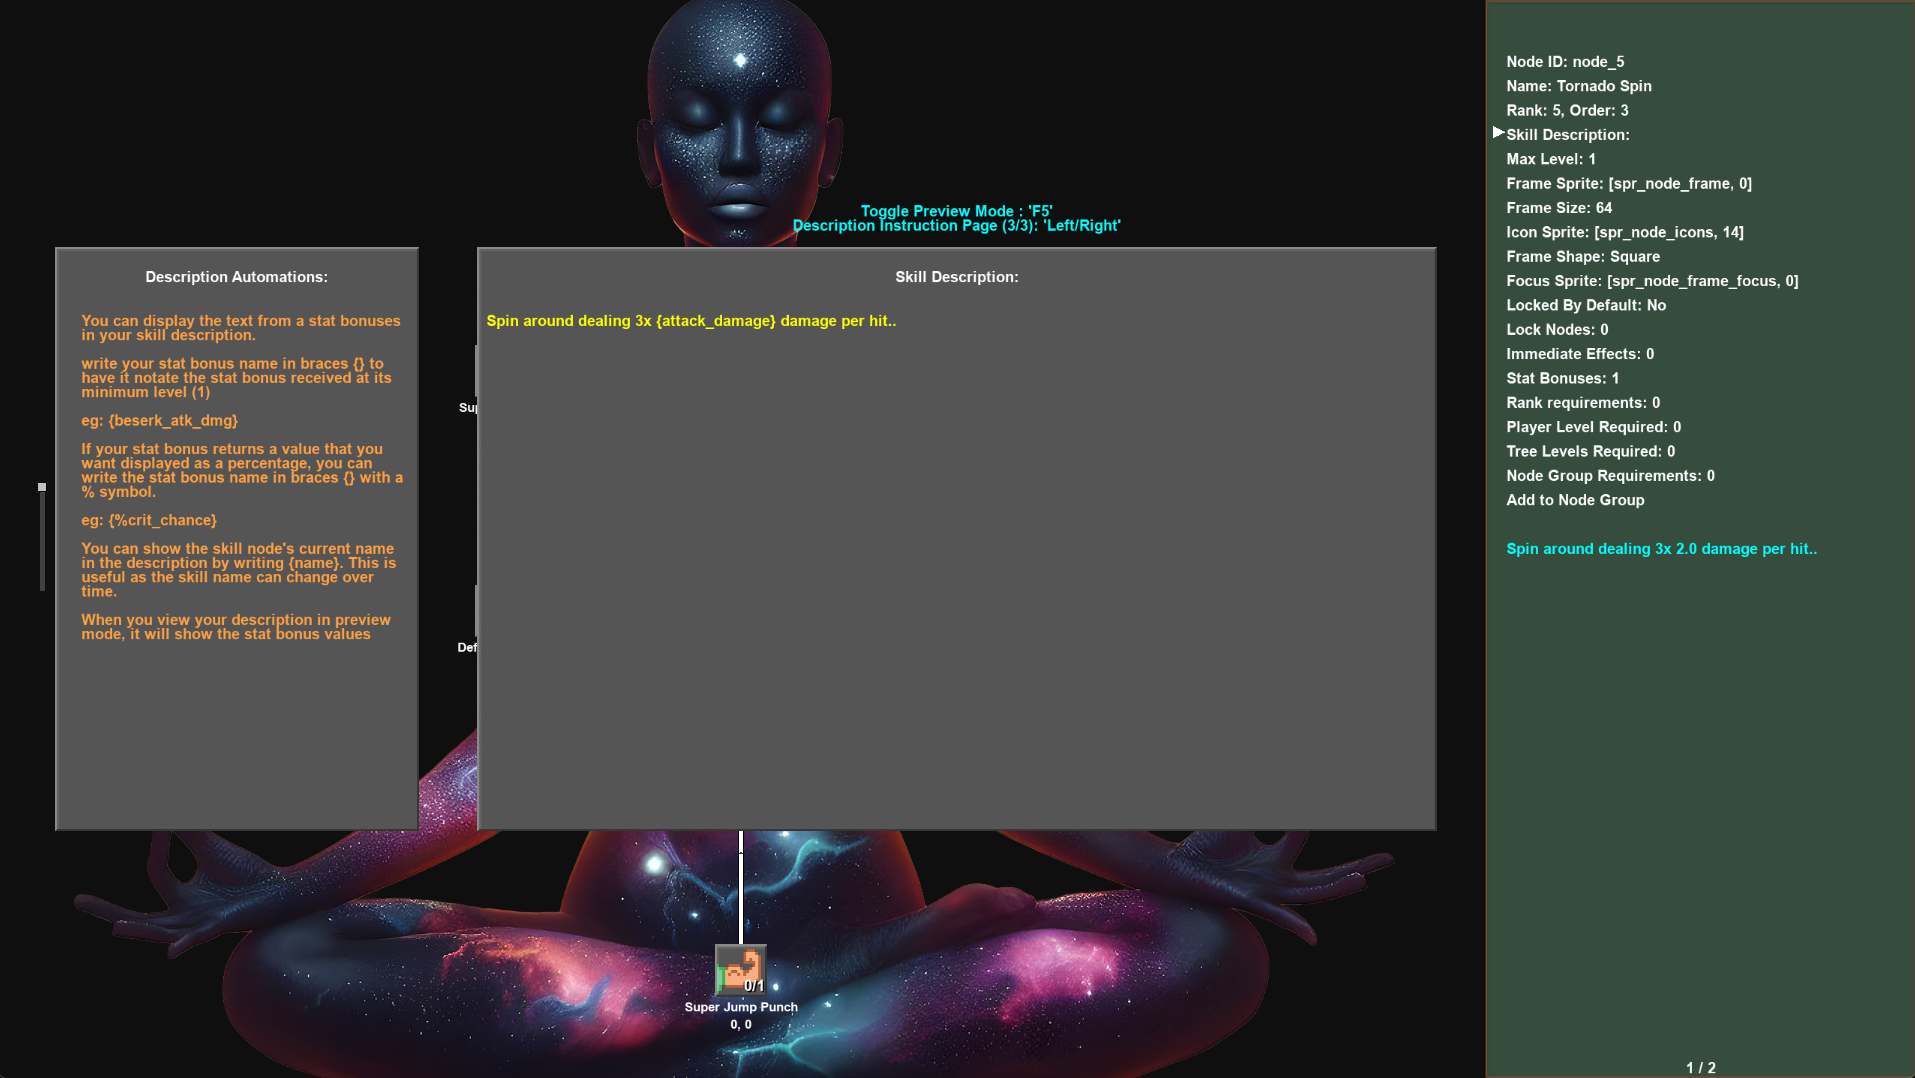
Each skill node can be given a skill description to explain to the player what will be earned by levelling it up.
The Description Instruction Pages on the side of the screen tell you which stat bonuses are granted from this skill node and give you examples of ways you can use the skill description to include special values.
Example 1
If a skill gives you a STR stat bonus, then you can specify in the description:
Grants {STR} STR
The {STR} will be replaced with the value that will be obtained at that level.
Example 2
If the stat bonus gained from the skill is Crit_Chance and is supposed to be used as a multiplier and returns a value like 0.2, you can write it in the description like:
Grants {%Crit_Chance}% Crit Chance
The final output will say Grants 20% Crit Chance.
Example 3
If you want to use the skill name in the skill, you can write it as {name}.
{name} will grant {%Crit_Chance}% Crit Chance
Using {name} instead of typing the name directly ensures that if the name is changed, it will update the description accordingly.
This allows you to have a skill named Wild Hit, then at level 2 change the name to Focused Hit, and then at level 3 change it to Precise Hit. The description will always show the correct skill name.
Example 4
You can do basic arithmetic in between braces like {2 + 2}. If your description says:
Give {2 + 2} HP
It will show as Give 4 HP.
This can be further utilised to include stats as well.
Example 5
You can get the total stat value received from all currently unlocked skill nodes and levels by using {@stat_name}.
So you could have a description like:
Grant {Armor_Penetration} Armor Penetration,
Current Total Damage = {{@STR} + {@Armor_Penetration}}
And this will replace the values with the current bonuses received and add them together.
Expand your Tree
Place more nodes and repeat the above steps to create a small or enormous sprawling skill tree.
Importing/Exporting
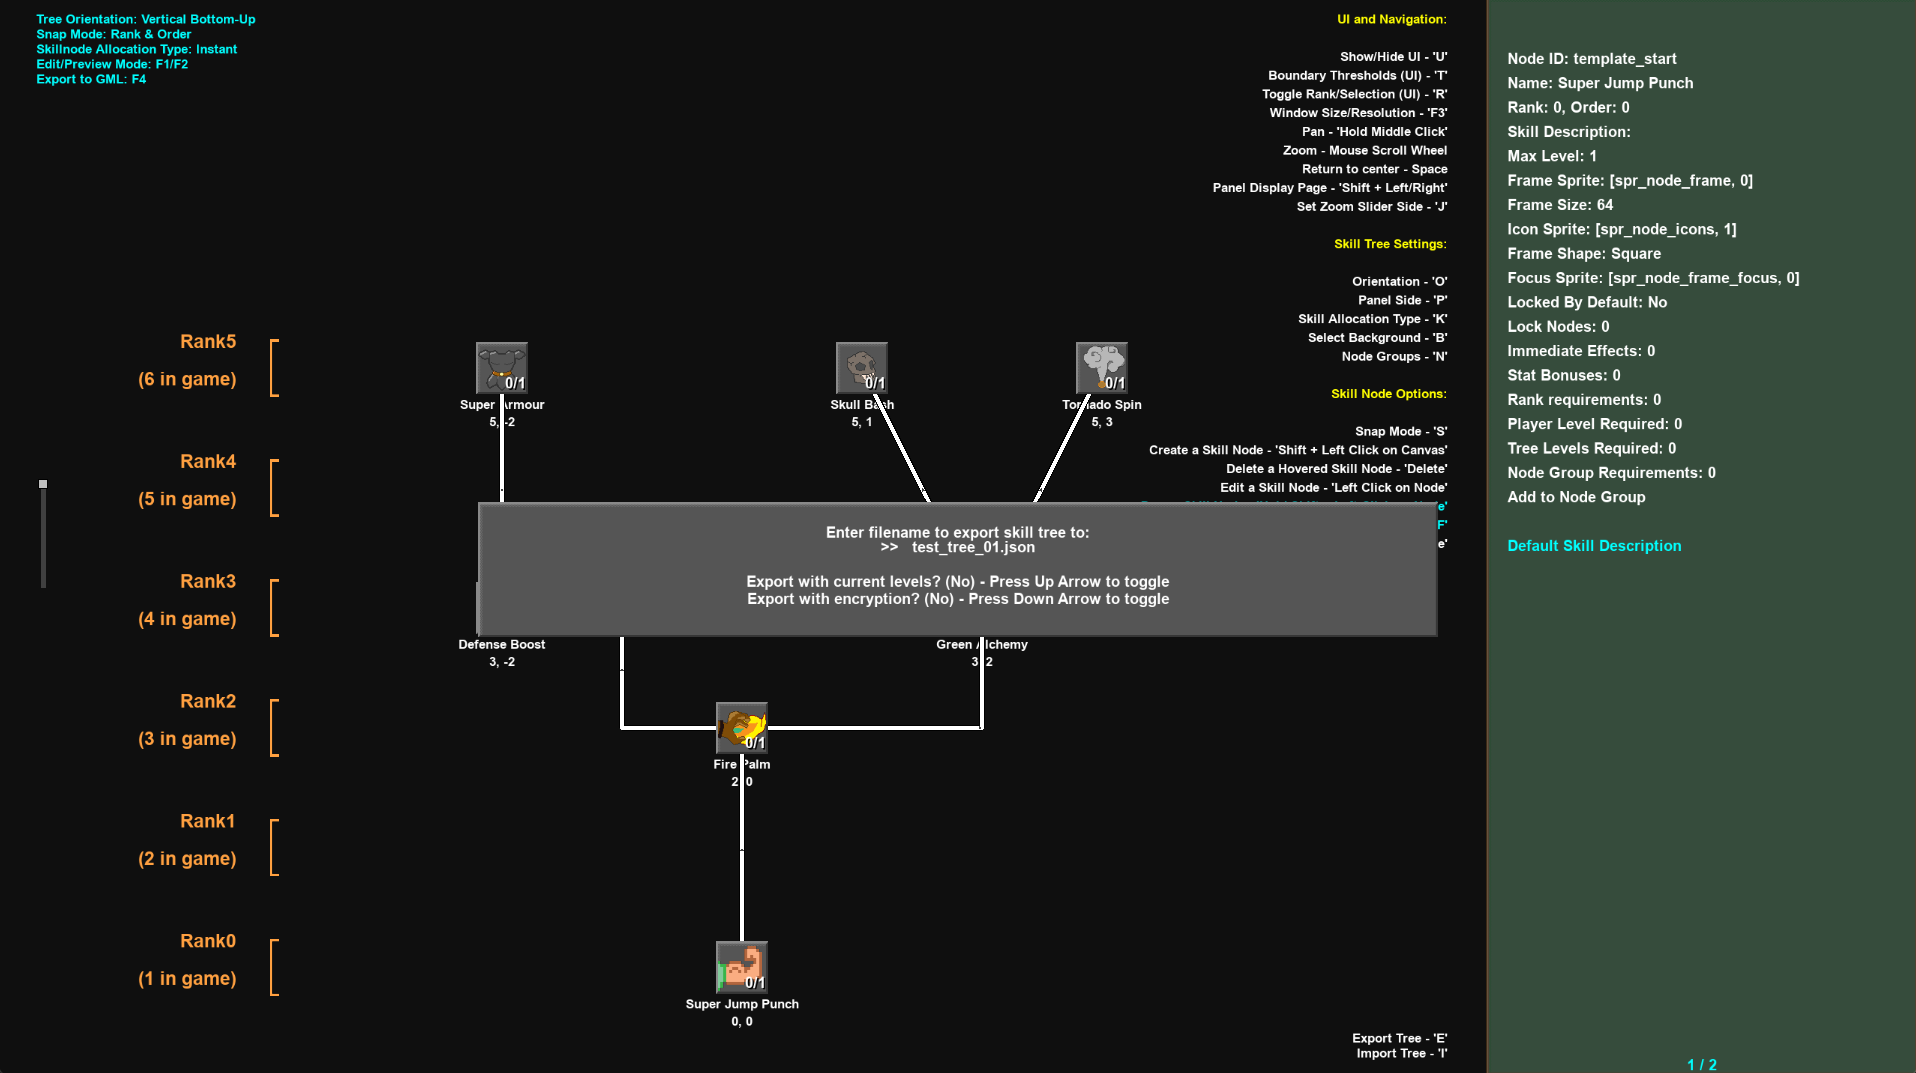
Skill Trees you have created can be exported into external files and then re-imported back into the builder or your project. Importing and Exporting is recommended when using the skill tree builder.
From the main canvas screen, press the E button to export the current tree to a file.
You can press the down arrow to select whether to export the file as a .dat file or .json. A .dat file will be encrypted based on the xor encryption key noted in the macros. A .json will export a file as plain text.
The exported file will be saved in C:\Users\[Username]\AppData\ESTE.
From the main screen, press the I button to import a file that was previously exported. This is a great way to save your progress or create multiple variations of a skill tree.
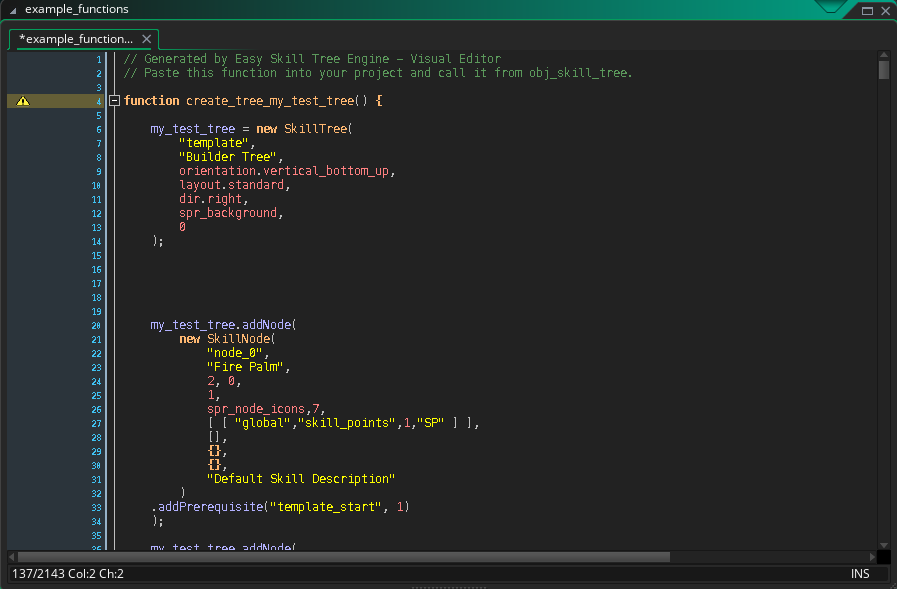
Once you have completed your skill tree and are ready to incorporate it in your own project, press the F4 button to Export your tree as GML. You’ll be prompted for an ID for this tree. This ID will be used to create a function and copied to your clipboard.
In your own project, you can paste this function into a script.
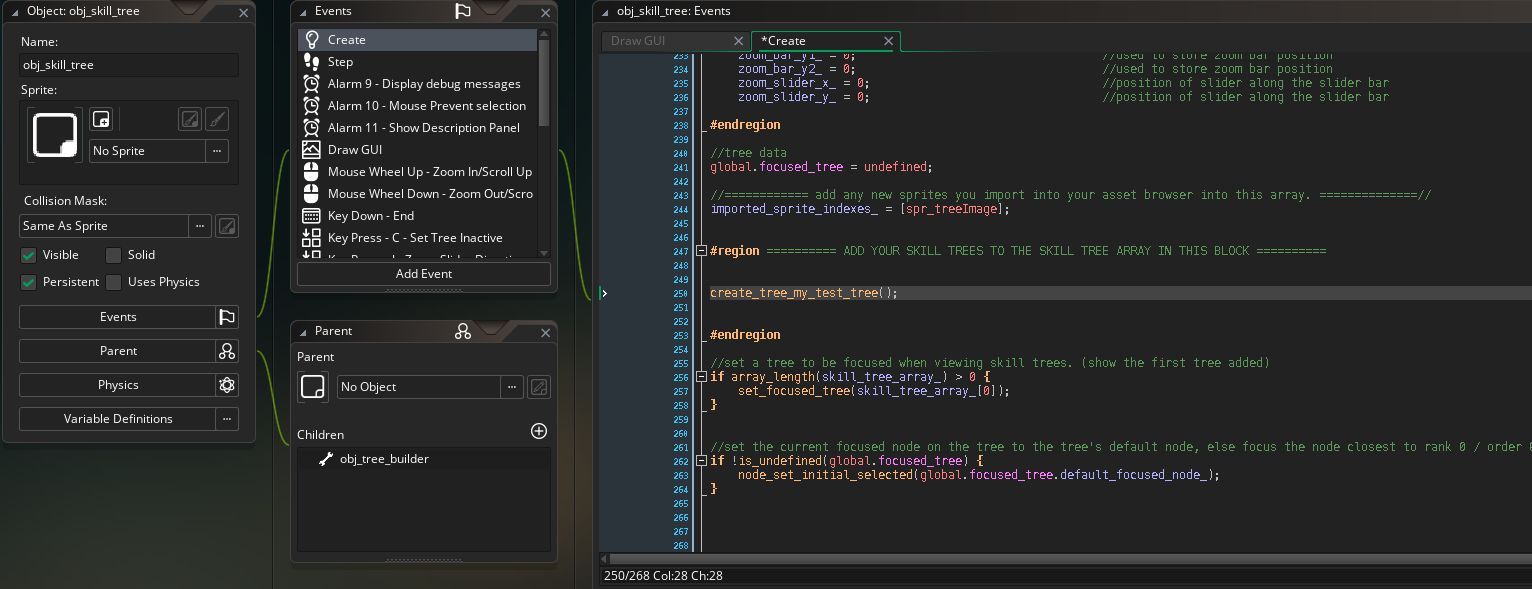
Once the function has been pasted in your project, make sure you also call this function in the create event of the obj_skill_tree in your project.
Creating a Skill Tree with GML
4 Step Summary
As mentioned earlier, the creation of a skill tree mainly consists of 4 main steps:
Create the tree: new SkillTree(...)
Create nodes: new SkillNode(...)
Add nodes to the tree
Push tree to the tree array (macro SKILLTREE_ARRAY)
It may be helpful to create a new function per skill tree to conduct all the above steps with one function call. For example:
function skill_tree_initialize_offensive_abilities() {
  // define tree & nodes and push to array
}
Step 1 - New Skill Tree
The SkillTree constructor creates a new instance of a skill tree that accepts a number of arguments when called.
Choose the side of the screen that the skill description panel will be showing on
_background
Sprite Index
Undefined
Pick a background to show behind the skill tree
_image_index
Numeric
0
Image index of the _background sprite to display
An example call to create a new skill tree can look like this:
tank_defensive_tree = new SkillTree(
  "t_defensive",
  "Skills focused on increasing defensive capabilities",
  orientation.vertical_bottom_up,
  layout.standard,
  dir.down,
  spr_tree_background,
  1
);
This above example will create a new skill tree called “t_defensive” with a vertical orientation and store it in the variable tank_defensive_tree. The tree is stored in this variable so we can add it to the skill tree array once all nodes have been added.
Step 2 - Create Skill Nodes
The SkillNode constructor creates a new instance of a skill node that accepts a number of arguments when called.
Arguments:
Name
Data Type
Default
Purpose
_id
String
N/A
Give an ID to reference the node
_name
String
N/A
Give a name to the skill
_rank
Numeric
N/A
The rank that the skill node is positioned in
_position_in_rank(order)
Numeric
N/A
The position of the node in the rank (0 being the center)
_max_level
Numeric
N/A
Max amount of level up actions allowed on this rank
_sprite
Sprite Index
N/A
The sprite to be drawn on the node
_image_index
Numeric
N/A
The image index of the sprite to be drawn on the node
_cost
Array
SKILLNODE_DEFAULT_COST
The cost to perform a level up action.
_immediate_effects
Array
[]
Any effects that occur whenever a level up action is performed
_stat_formulas
Struct
undefined
Stat bonuses that are provided by this skill tree
_level_overrides
Struct
undefined
Any level overrides to the stat formulas provided
_description
String
""
A text description of the skill
An example call to create a new skill node can look like this:
This code created a new SkillNode which is stored in the variable td_0_0_hp_up (which is the same name as it’s ID). This is so we can reference this node when we eventually add it to the skill tree we created.
The arguments passed through each section of this skill node are explained below:
Argument
Notes
_id
This constructor has created a new SkillNode with the id “td_0_0_hp_up”. A meaningful unique name was assigned as the id. “td” refers to the tank defensive tree, 0_0 refers to the first node on the first rank. “hp_up” is a simple description of the skill.
_name
The name “Reinforced Armor” was given to this skill and will be displayed on the description panel when highlighted.
_rank
This skill was created on rank ‘0’. So it will be one of the earlier skill able to be learned in this skill tree.
_position_in_rank(order)
The position was assigned as ‘-0.5’. This node will not be in the centre position of the rank but rather a bit to the left (since the tree it’s going to be added to is a vertical tree). If the node was to be placed in the very centre, the position would be 0. But if there is an even number of nodes in the rank, it might be desirable not to have a node directly in the center.
_max_level
This node was assigned a max level of 3 meaning it can have up to 3 level up actions performed on this node at a maximum.
_sprite
The sprite index ‘spr_node_icons’ was selected to draw the skill’s image on the skill node.
_image_index
The image index of 0 was passed through. So the sprite that will be drawn is the first image index on spr_node_icons.
_cost
The default value was passed through in the cost argument, meaning the default value of 1 skill point from global.skill_points is the cost to perform a level up action on this skill node.
_immediate_effects
The immediate_effects_ array was populated with one immediate effect. When a level up action is performed on this skill, the global variable global.abilities[abilities.lucky_dodge] will be set to true.
_stat_formulas
A stat formula was created with a stat named lucky_dodge_chance. This stat was assigned a curve where each level’s stat value was provided. 0.3 at level 1, 0.5 at level 2 to a maximum of 0.8 at level 5. Even though the max level of the skill is 3, the stat value caps at level 5 in case any items would push the skill’s level beyond it’s max level of 3. Because the formula used was ‘curve’ even if the node’s level was boosted beyond level 5 with items, the bonus provided by the stat formula would not exceed the highest value provided (0.8).
_level_overrides
Nothing was passed through the level overrides argument, meaning a function call to retrieve the current stat bonus from this skill will always calculate from the stat formula.
_description
The skill description was set as "Increase max hp by { player_max_hp }." When the skill is highlighted in game, { player_max_hp } will be replaced in the description string with the current skill bonus (or the bonus at level 1 if it has not yet had an initial level up action performed)
Before adding this node to the skill tree, a second skill node will be created using the SkillNode constructor again.
td_1_1_lucky_dodge = new SkillNode(
  "td_1_1_lucky_dodge",
  "Lucky Dodge",
  1,-0.5,
  3,
  spr_node_icons,8,
  SKILLNODE_DEFAULT_COST,
  [
    { op:"set", context:"global", path:["abilities", abilities.lucky_dodge], value:"true" }
  ],
  { lucky_dodge_chance:"curve(0.3,0.5,0.7,0.75,0.8)" },
  {},
  "When getting hit by an enemy, {name} provides a {%lucky_dodge_chance}% chance to avoid taking damage"
).addPrerequisite("td_0_0_hp_up",1);
This code created a new SkillNode which is stored in the variable td_1_1_lucky_dodge (which is the same name as it’s ID). This is so it can be referenced by this value when we eventually add it to the skill tree we created.
The arguments passed through each section of this skill node are explained below:
Argument
Notes
_id
This constructor has created a new SkillNode with the id “td_1_1_dodge”. A meaningful unique name was assigned as the id. “td” refers to the tank defensive tree, 1_1 refers to the second node on the second rank (rank 1). “dodge” is a simple description of the skill.
_name
The name “Lucky Dodge” was given to this skill and will be displayed on the description panel when highlighted.
_rank
This skill was created on rank ‘1’. So it will be drawn on the rank after the rank with the Reinforced Armour skill node.
_position_in_rank(order)
The position was assigned as ‘-0.5’. Which is the same as the Reinforced Armour skill. So this node will be positioned above the previous skill on the skill tree.
_max_level
This node was assigned a max level of 3 meaning it can have up to 3 level up actions performed on this node at a maximum.
_sprite
The sprite index ‘spr_node_icons’ was selected to draw the skill’s image on the skill node.
_image_index
The image index of 8 was passed through. So the sprite that will be drawn is the ninth image index on spr_node_icons.
_cost
The default value was passed through in the cost argument, meaning the default value of 1 skill point from global.skill_points is the cost to perform a level up action on this skill node.
_immediate_effects
The immediate_effects_ array was populated with two immediate effects. When a level up action is performed on this skill, global.player_max_health will increase by 1 and global.player_health will increase by 1. Further details about how to structure these effects will be explained below
_stat_formulas
A stat formula was created to indicate that the stat named player_hp is increased by a linear amount (1) for each level up action completed. More details about how to setup stat formulas will be explained below
_level_overrides
Nothing was passed through the level overrides argument, meaning a function call to retrieve the current stat bonus from this skill will always calculate from the stat formula.
_description
The skill description was set as "When getting hit by an enemy, {name} provides a {%lucky_dodge_chance}% chance to avoid taking damage"
When the skill is highlighted in game, the part of the description written as {name} will be replaced with the name of the skill.
the part of the description {%lucky_dodge_chance} will be replaced with the current skill bonus (or the bonus at level 1 if it has not yet had an initial level up action performed).
Because there is a % symbol before the stat name within the braces, the text shown in the description will be formatted as a percent instead of the value in the stat formula. So at level 1 the description will read:
“When getting hit by an enemy, there is a 30% chance to avoid taking damage”
After creating the skill node, the method addPrerequisite() is called to add the “Reinforced Armour” skill at level 1 as a prerequisite to be able to perform any level up actions on “Lucky Dodge”.
Step 3 - Adding Nodes to a Tree
After nodes have been created, it’s really simple to add them to the skill tree.
If nodes were created and assigned to a struct variable like this:
root_node = new SkillNode(
	"c_attack_1",		//node id
	"Basic Attack",	//name
	0, 0,	  //rank, order (position in rank)
	5,      //max level of skill
	spr_node_icons, 0,,,	//sprite icon and frame
  {		//skill formula
		weapon_multiplier: "linear(1.7)"	//stat increases by 1.7 each level
	},
	_overrides,		//apply level overrides
	"A simple melee strike that deals {weapon_multiplier}x weapon damage." //skill description
	).setLevel(1);
Then nodes can be added to a tree by calling the addNode() function for the tree and passing through the node struct variable names like this:
And continue until all the nodes you’ve made have been added to the tree.
Although as an alternative, nodes can be added to the skill tree immediately upon creation like this:
combat_tree.addNode( new SkillNode(
  "c_attack_1",		//node id
	"Basic Attack",	//name
	0, 0,           //rank, order (position in rank)
	5,  //max level of skill
	spr_node_icons, 0,,,	//sprite icon and frame
  {	 //skill formula
		weapon_multiplier: "linear(1.7)"	//stat increases by 1.7 each level
	},
	_overrides,		//apply level overrides
	"A simple melee strike that deals {weapon_multiplier}x weapon damage." //skill description
	).setLevel(1)
)
Step 4 - Add the Tree to the Array
When all the skill nodes have been added to a skill tree, you can add that tree to your skill tree manager object’s skill tree array with the built in GameMaker function array_push:
array_push(SKILLTREE_ARRAY, combat_tree);
Once the tree has been added to the skill tree array, it can be viewed, navigated through and stat bonuses can be derived from it.
Immediate Effects
Immediate effects are actions that can occur, immediately as a level-up action is performed on a skill node.
You can set any number of effects to occur by adding structs to the immediate effect array in the skill node creation. (Or added afterwards by modifying the skill node)
The different types of immediate effects are:
Call a function
Modifying a variable
Create an instance
Modify an existing skill node
Calling a Function
Calling a function is the most veratile immediate effect as you can call a single function to perform a number of effects at once. To add an immediate effect that calls a function, a struct must be added to the immediate effect array with the keys "op" and "name". If arguments are required to be passed to the function, then one more key is required "args".
op : "function" -> Tells the engine that this immediate effect will call a function
name : "blast_confetti" -> Tells the engine that it will be calling the function named 'blast_confetti'
args : [90, "rainbow"] -> (optional) Will pass the arguments in the array into the function being called
Modifying an Existing Variable
To add an immediate effect that adds an amount to an exiting variable, a struct must be added to the immediate effects array with the keys "op", "context", "path" and "value"
op : "set" -> Tells the engine that a variable will be set to the value provided in the "value" key
op : "add" -> Tells the engine that a variable will be modified, adding the value provided in the "value" key
op : "sub" -> Tells the engine that a variable will be modified, subtracting the value provided in the "value" key
op : "mult" -> Tells the engine that a variable will be modified, multiplying by the value provided in the "value" key
op : "div" -> Tells the engine that a variable will be modified, dividing by the value provided in the "value" key
context : "global" -> Tells the engine that it will be modifying a global variable
context : ["instance", obj_player] -> Tells the engine that it will be modifying a variable contained in the instance named obj_player
path : "max_hp" -> Tells the engine that it will be modifying the variable named 'max_hp'
path : ["weapon", 0] -> Tells the engine that it will be modifying the variable stored within weapon[0]
path : ["weapon", 0, 1] -> Tells the engine that it will be modifying the variable stored within weapon[0][1]
path : ["weapon", "range_type", 1, "ammo"] -> Tells the engine that it will be modifying the variable stored within struct weapon.range_type[1]."ammo"
value : 5 -> The value that will be set or modified with this effect
Creating an Instance
An immediate effect can be made to create an instance directly. To create an instance this way, a struct must be added to the immediate effects array with the keys "op", "x", "y" and "object"
op : "instance_create" -> Tells the engine that the instance_create function will be called
op : "instance_create_depth" -> Tells the engine that the instance_create_depth function will be called
op : "instance_create_layer" -> Tells the engine that the instance_create_layer function will be called
x : 100 -> The x value of the instance will be 100
y : 300 -> The y value of the instance will be 300
depth : 0 -> If "instance_create_depth" was selected as the operation, then this will pass the depth of the instance created
layer : "Instances" -> If "instance_create_layer" was selected as the operation, then this will pass the layer of the instance created
object : obj_enchantment -> Tells the engine to create this object type
init : { strength_bonus : 5 } -> (optional) The init struct that will be passed through the create instance function
relative_to : i_player -> (optional) Will create the new instance with x and y values relative to this instances position
Modifying an Existing Skill Node
You can update data of an existing skill node as part of an immediate effect. For example if you had a skill node with the name "Fire", upon level-up, you can update the skill's name to "Fira"
To update a skill node this way, a struct must be added to the immediate effects array with the keys "op", "id" and additional keys corresponding to the value requiring an update
op : node_update -> Tells the engine that a skill node will be updated
id : "magic_fire" -> Tells the engine which skill node it will be updating
name : "Firaga" -> Tells the engine that the name of the targeted skill node will change to "Firaga"
rank : 3 -> Updates the skill node's rank to 3
order : -5.5 -> Updates the skill node's order to -5.5
max_level : 4 -> Updates the skill node's max level to 4
sprite : spr_magic_special -> Updates the skill node's sprite to this asset
image_index : 24 -> Updates the skill node's image index to this value
description : "Extreme Fire Damage" -> Updates the skill node's description to this value
prerequisities : ["magic_firesword", "magic_icesword"] -> Updates the skill node's prerequisite nodes to those with the supplied IDs.
rank_requirements : [[1,2], [2,2]] -> Updates the skill node's rank requirements to require 2 skills in rank 1 and 2 skills in rank 2 before a level-up action can occur
player_level_required : 20 -> Updates the skill node's required player level before a level-up action can occur
tree_points_required : 8 -> Updates the skill node's required tree point spend before a level-up action can occur
stat_formulas : {fire_burn_chance : "linear(0.3)"} -> Updates the skill node's stat bonuses to the provided struct
locks : ["magic_ice", "magic_icesword"] -> Updates the skill node's locks array so that when the targetted skill node has a level-up action performed, the supplied nodes will be locked
Level Based Effects
Every effect can be set to only trigger when a level-up action is performed on specific levels. This can be done with adding the keys "apply_at_level" or "apply_at_and_above_level" in the effect struct.
apply_at_level : 3 -> Tells the engine that this effect will only trigger when the node is levelled-up reaching level 3
apply_at_and_above_level : 3 -> Tells the engine that this effect will only trigger when the node is levelled-up reaching level 3 and every level thereafter
Examples
The below example has an immediate effect that executes function blast_confetti(90, "rainbow")
sample_node = new SkillNode(
"example_1",    //node id
"Increase Relationship", //name
0, 0,   //rank, order (position in rank)
5,    //max level of skill
spr_node_icons, 0,,   //sprite icon and frame
    [
      {
        op : "function",
        name : blast_confetti,
        args : [90, "rainbow"]
      }
    ],
    {},   //no stat bonuses
    {},   //no level overrides
	"Example skill node." //skill description
	);
The below example has an immediate effect that sets global.max_stam to 100 and adds 1 to obj_game.total_upgrades
sample_node = new SkillNode(
"example_1",    //node id
"Boost Stamina", //name
0, 0,   //rank, order (position in rank)
5,    //max level of skill
spr_node_icons, 0,,   //sprite icon and frame
    [
      {
        op : "set",
        context : "global",
        path : "max_stam"
        value : 100
      },
      {
        op : "add"
        context : ["instance", obj_game],
        path : "total_upgrades"
        value : 1
      }
    ],
    {},   //no stat bonuses
    {},   //no level overrides
	"Example skill node." //skill description
	);
The below example has a skill node with an immediate effect that updates its own name and description at level 3 and level 5. Additionally, at level 3 and every level after, it will perform a modification to a variable at level 3 and each level after
sample_node = new SkillNode(
"example_1",    //node id
"Fire Attack", //name
0, 0,   //rank, order (position in rank)
5,    //max level of skill
spr_node_icons, 0,,   //sprite icon and frame
    [
      {
        apply_at_level : 3
        op : "node_update",
        id : example_1
        name : Very Hot Fire Attack,
        description : "Shoot a very hot fire attack"
      },
      {
        apply_at_level : 5
        op : "node_update",
        id : example_1
        name : Super Hot Fire Attack,
        description : "Shoot a super hot fire attack"
      },
      {
        apply_at_and_above_level : 3
        op : "add"
        context : ["instance", obj_game],
        path : "total_fire_star_upgrades"
        value : 1
      }
    ],
    {},   //no stat bonuses
    {},   //no level overrides
	"Shoot a fire attack." //skill description
	);
Stat Formulas
Stat formulas provide a bonus to a specific stat and can increase (or decrease) as the player increases the level of the skill node.
Consider a skill node with a stat formula where the intended bonus is to grant 2 strength per skill node level. There are multiple ways you can achieve this. The two main methods of creating stat formulas are by either creating a function that will return the desired value. Or by using the engine’s “Easy Notation” that can turn readable strings into a function that produces the same effect.
To create this stat bonus using functions, it could be created like this:
The same effect can be achieved through “Easy Notation” by creating it as:
{ strength : “linear(2)”}
Both of the above options have the same effect.
Another example would be to manually set the return value at each level. To achieve this via a function, it could be created as:
 {
  strength :  function(_level) {
		switch (_level) {
			case 0:
			case 1: return 3;
			case 2: return 7;
			case 3: return 17;
			case 4: return 30;
			default: return 63;
		}
  }
The same effect can be achieved through “Easy Notation” by creating it as:
{ strength : curve(0,3,7,17,30,63)”}
“Easy Notation” options you can use are as follows:
Notation
Effect
Example
"linear"
Return value * level
"linear(3.5)"
"linear_from"
Return value * level once the node reaches the target level. Target level is the first argument. Linear value is the second.
“linear_from(3, 0.35)”
"constant"
RReturn a constant value
"constant(10)"
"constant_from"
Return a constant value once the node reaches the target value. Target level is the first argument. Constant value is the second.
"“constant(3, 0.5)”
"curve"
Specify return values per level
“curve(2,3,5,6,12)”
"stat_formula_add"
Add two values together
“stat_formula_add(constant(5), linear(3))”
"stat_formula_sub"
Subtract two values
“stat_formula_sub(constant(100), linear(10))”
"stat_formula_mult"
Multiply two values
“stat_formula_mult(curve(1,5,9), linear(1.2))”
"stat_formula_div"
Divide two values
“stat_formula_div(constant(40), linear(3))”
Easy Notation can also be nested. So you can have a linear check and a curve check within a stat_formula_add
Export note:
Exporting and Importing skill trees is not a required to develop a game using the Easy Skill Tree Engine. If this feature is something you want to use, it is important to note that functions and function names cannot be serialized into a .dat or .json file. Using functions in stat formulas, immediate effects or skill costs will cause the export to create an inaccurate build of your tree. It's therefore advised to use the easy notation in your stat formulas
Items
The ability to create items and have them influence your skills and stat bonuses have been included in the Easy Skill Tree Engine.
Basics
Items can be created in the ITEM_ARRAY to act as a catalogue of equipment. Like skill nodes, items also have stat bonuses and immediate effects that can be set to trigger upon equipping.
An item can be created in a similar fashion as a skill node, except they don’t need to be attached to a skill tree. The constructor can be called and the item can be pushed into the ITEM_ARRAY.
Skill Node Boosts
Item variable: skill_node_boosts_
Variable Type: Struct
An item can boost skill nodes to increase a skills overall effectiveness. So if your game has a skill with a stat formula that increases player strength by 5 per level and its max level is 3. An item that has this skill in its skill_node_boosts_ struct can increase that node’s item_level_, so if the node boost contained 1 level, then that skill node with a max level of 3 will be at an effective level of 4, granting 20 overall strength.
Immediate Effects
Item variable: immediate_effects_
Variable Type: Array (containing structs)
Just like skill nodes, an item can trigger an immediate effect the moment it is equipped. Item immediate effects work exactly the same as a skill node, so you may update a variable or execute a function to create any type of desired effect to occur when the item is equipped.
Stat Modifiers
Item variable: stat_modifiers_
Variable Type: Struct
Items hold stat modifiers, similar to how skill nodes hold stat formulas. However stat modifiers are always a constant amount regardless of item level, unless the value is manually updated.
If an item and a skill node share the name of a stat bonus, then calling the function stat_bonus_get_total(“_stat_bonus_name”) will return the total stat bonus from items and skill nodes combined.
If you need to get stat bonuses specifically from items without including bonuses from skill nodes, you can use the function stat_bonus_get_from_items(“_stat_bonus_name”)
Additional Variables
The SkillItem constructor also contains additional variables named
level_
rarity_
applicable_characters_
These variables can be used to assist in your style of game.
You might have all your items starting at level 1 and have them level up as your game progresses. Or you might want to preset your item levels and restrict them from spawning unless your player is within 10 levels of that item.
Rarity can be used to group items together by rarity and limit the frequency that a rare item is found.
You can also prevent specific characters from obtaining certain items by limiting the item to a specific class or a subset of your game’s character classes.
Important Item Methods
equipItem() and unequipItem()
Arguments: none
Equipping an item will check for any skill node boosts attached to the item and apply item levels accordingly. It will also trigger onEquip() which will complete any immediate effects attached to the item.
Unequipping an item will reverse any skill node boosts that were granted to a skill when this item was equipped.
getFormattedDescription()
Arguments: none
This function will return the description_ string of the item. As items will generally reference stat formula values and skills, it will replace {stat_formula_name} with the corresponding skill name as well as skill names or percentages when preceded with a % sign.
Creating An Item
An item can be created by calling it’s constructor directly. It is important to add the created item to the ITEM_ARRAY so that item related functions can recognise and interact with the item.
The SkillItem constructor creates a new instance of an item that accepts several arguments when called.
Triggers an effect immediately upon equipping the item
_stat_modifiers
Struct
{}
Stat bonuses granted to the player while equipped
_skill_node_boosts
Struct
{}
Skill Node item level boosts that are applied while the item is equipped
Examples
An example call to create a new item can look like this:
array_push(ITEM_ARRAY, new SkillItem(
	"swordsman_common_0",			//item id
	"Whetstone",				//item name
	1,					//item level
	rarity.common,				//item rarity
	[class.swordsman],			//characters who can pick up item
	spr_item, 0,				//sprite and image index
	"Increase attack damage by {atk_dmg}",	//item description
	,					//no immediate effect
	{
		atk_dmg : 10			//item grants flat bonus
	}
	,					//no skill boost
));
The above example will create a new item with the id “swordsman_common_0” named “Whetstone”. This example also pushes the item to the ITEM_ARRAY immediately upon creation so that it can be interacted with by item related functions. When equipped this item will simply grant a stat bonus named atk_dmg with a constant value of 10.
Another example to show an item that will grant a skill boost to an item would look like this::
array_push(ITEM_ARRAY, new SkillItem(
	"shared_rare_0",			//item id
	"Oak Talisman",				//item name
	1,					//item level
	rarity.rare,				//item rarity
	[class.swordsman. class.monk],		//characters who can pick up item
	spr_item, 1,				//sprite and image index
	"--Skill Boosts:-- \n{l1_2_2_atk_spd}\n{l3_5_0_mp}",	//show skill names in description
	,					//no immediate effect
	{},					//no stat bonus
	{
		"l1_2_2_atk_spd" : 2,		//grant 2 levels to this ability
		"l3_5_0_mp" : 1			//grant 1 level to this ability
	}));
Useful Functions
The below useful functions can help you get the most out of the Easy Skill Tree Engine
Getters and Setters
is_skill_tree(_struct)
Returns: Boolean
Arguments:
Name
Data Type
Purpose
_struct
Struct
Checks this value to see if it is a valid skill tree struct
Return whether the passed through struct is a valid skill tree struct
is_node(_struct)
Returns: Boolean
Arguments:
Name
Data Type
Purpose
_struct
Struct
Checks this value to see if it is a valid skill node struct
Return whether the passed through struct is a valid skill node struct
tree_find_by_id(_id)
Returns: Skill Tree (Struct) or Undefined
Arguments:
Name
Data Type
Purpose
_id
String
Searches the Skill Trees in the Skill Tree Array to return the one with the supplied ID
Returns the skill tree struct with the ID provided. If a tree with the provided ID isn't found, the function returns undefined.
node_find_by_id(_id)
Returns: Skill Node (Struct) or Undefined
Arguments:
Name
Data Type
Purpose
_id
String
Searches all skill trees to find the skill node with this ID
Returns the skill node struct with the ID provided. If a node with the provided ID isn't found, the function returns undefined.
Opt to fail load if your game version does not match the version in the file data
_reconstruct_node_immediate_effects
Boolean
Perform all immediate effects of nodes with levels > 0
Loads all Tree data, Item data and necessary global variables
All skill nodes will be reset and then reconstructed based on the data provided.
If _fail_on_version_mismatch is true and there is a version mismatch between your game and the file, (or if the game was unable to load from the file) the function will return false.
If _fail_on_version_mismatch is false and there is a version mismatch, the game will still attempt to load as much data as it can from the file
It's important to note that before loading, you should ensure that external variables related to skills and abilities should be reset so they can be reconstructed correctly from the load.
skill_tree_on_reset() is an empty function that is provided and called after the load completes. You're encouraged to edit this to execute any code you need to run after a load.
skill_tree_reset(_tree)
Returns: N/A
Arguments:
Name
Data Type
Purpose
_tree
Struct
Skill tree that is the target of the reset
Resets all nodes on the specified skill tree to level 0 and refund all skill points used back to the pool
skill_tree_reset_all()
Returns: N/A
Arguments: None
Resets nodes on all skill trees to level 0 and refund all skill points used back to the pool
skill_tree_rebuild()
Returns: N/A
Arguments: None
destroys all existing skill trees and rebuild
Note - Your tree creation code (like what is used in the obj_skill_tree create event) is required in this function
Others
player_level_up(_amount)
Returns: N/A
Arguments:
Name
Data Type
Purpose
_amount
Numeric
Amount to add to the player level
Adds the supplied amount to the player level and then checks to see if any locked nodes that were given a player level lock can be unlocked
tree_count_active()
Returns: Numeric
Arguments: None
Returns the number of active skill trees
tree_count_visible()
Returns: Numeric
Arguments: None
Returns the number of visible skill trees
Item Functions
stat_bonus_get_from_items(_stat_name)
Returns: N/A
Arguments:
Name
Data Type
Purpose
_stat_name
String
Stat bonus name to search for
Returns the total stat bonus of the supplied bonus name from across all equipped items.
item_get_equipped(_is_equipped)
Returns: Array of items
Arguments:
Name
Data Type
Purpose
_is_equipped
Boolean
true to search for equipped items. false for unequipped
Returns an array of items that are either currently equipped or unequipped depending on the argument
Each array index returned contains a nested array containing the item struct, the item's level and rarity
item_roll_rarity(_offset)
Returns: Numeric (Corresponding to either rarity.common, rarity.rare, rarity.epic, rarity.legendary)
Arguments:
Name
Data Type
Purpose
_offset
Real
Modify the chance to roll all rarity values by this offset
A random number is rolled and based on the outcome, this function returns a rarity out of the rarity enum values.
By default the chance to roll each rarity is:
Common: 70%
Rare: 20%
Epic: 6%
Legendary: 2%
The offset will modify the values such that it could be harder or even impossible to roll Rare, Epic or Legendary outcomes
item_remove_from_catalogue(_item_id)
Returns: N/A
Arguments:
Name
Data Type
Purpose
_item_id
String
Item ID to remove
Deletes the specified item from the item array. It will no longer be able to be equipped.
 Fat Pint Games